2022. december 31., szombat

End of 2022

This is some valuation of the year from this blogs perspective.

At the beginning of the year I was planning to write at least one post weekly. This would be 52 posts. Actually done 31.

Although, I'm not satisfied with the result, I is better than the previous years. The last year I was writing more, was 2018. I intend to achieve this as a goal for 2023.

Some highlights of 2022, also from my hobby perspective:

  • My new lab is still not finished, but I can tell, I moved in. Now I feel comfortable and spend more and more time in it
  • Finished the Videoton Melodyn project. I'm very proud of it. It was ready in time and functioning flawlessly
  • I closed my Hungarian language blog, what was running in parallel with this one. The decision come from anger at the first place, but today I feel, not writing (or translating) in to languages spare some time to me. So I keep it that way.
  • Started a few projects, what looks like shelved to me, also have a few revisited, but put back to the shelve:
    • E1300A Front connectors
    • Measurement control
    • CNC Router
    • Pan & Tilt gimbal
    • TL866II EPROM programmer update
    • PM3082 repair
    • Rackmount power amplifier
    • Function generator power amplifier
    • Contract project involving 4-20mA current loop and infra gates (not to discuss here deeper)
    • VFD display driver (even the first post of it kept in draft)

In 2023, I plan to work on my projects on a more organized way. Not to do many projects in parallel, focus on one, and finish it.

Also in 2020, I started to work on "project of the month", to force myself, to finish things in timely manner. This was washed by the COVID right at the beginning. I want to bring this back to life, to trigger myself.

Here I announce my January project (I really like to continue with more in February and further):

Fully working 3D printing

I've three 3D printers now. Actually only one of it working, and that one even kept in my old lab. Namely Anet A8, Geeetech i3 Pro, Anycubic Photon Mono 4k.
The goal, to have those fully working by end of January.

Those were my random thoughts for the end of 2022. I say good bye to 2022 with my current lab photos, and whish a

HAPPY NEW YEAR!


2022. december 29., csütörtök

New Arrival 8.

I mainly forgot to continue the new arrival series. Actually I just picked up some things today.
First a Philips PM6668 1GHz frequency counter for an insane €25.


As I have two counters already on the side of the ones I designed, I didn't keep it as I bought it for a friend who were looking for an RF counter for a while.
Also picked up three Leaver (Panasonic) VP-8193D generators for €125 each (to be honest, I payed for those at least a month ago already, just didn't find the time to pick it up)
One of it has a service sticker stating, it is dead, the others are untested, so those can also have problems. Some repair job is waiting for me on those.


On the side of the generator also picked up an ultrasonic cleaner for €75. It was a bit dirty, already cleaned it. It is bigger unit than my previous one. Also has a tap to drain the water, has heater and timer.
As a surprise the size is the same, what used by the ultrasonic record cleaners, what I intend to have. Now I don't need anything else than build the rotating mechanism for this. So, I have a new project. 😂

2022. december 28., szerda

"Melodyn" on Windows


As I successfully finished the Videoton Melodyn project, took into my head that I'll develop the software in it further.
Other than the radio itself, I have some shelved/planned projects what can good use of this software, I also need something to listen on my PC while I'm working.
In the last five years I worked exclusively for Linux projects professionally, but I still unable use Linux as development platform. The Linux desktop is not comfortable to me, so I'm using Windows.
The problem is coming from here.
I want to setup a development platform on Windows.
The mpd "on paper" is supported on Windows. Unfortunately the documentation, how to set it up is not existent.
So I downloaded, and was able to start mpd, on a trial-fail bases.
Download the latest mpd.exe from here: https://www.musicpd.org/download/win32/
Put it in the c:\mpd directory.
First it looking for a config file. I've no idea, what is the default location of the config file, so I put it next to the executable
mpd.conf:

audio_output {
  type "winmm"
  name "Speakers"
  device "Speakers (Realtek(R) Audio)"
}

This works with the Windows speaker on my PC.
In addition to this the mpd give the following error:

decoder: Decoder plugin 'wildmidi' is unavailable: configuration file does not exist: /etc/timidity/timidity.cfg

So I downloaded the wildmidi library from here: https://github.com/Mindwerks/wildmidi/releases
Put it under the c:\mpd\winmidi folder. Added to the mpd.conf the following also:

decoder {
    plugin "wildmidi"
    config_file "wildmidi/wildmidi.cfg"
}

With this, if I start the mpd with the following command line:

mpd.exe c:\mpd\mpd.conf

It start without error. The web radio from Melodyn.py works with it.
As I want to play audio files with it in the future, I don't know yet, if it will need additional setup.

Unboxing day

Finally after Christmas I arrived to my lab.

Look what arrived


First a whole set of Anycubic Photon Mono 4k printer:


To be honest I've no idea yet, how to make this thing working. Lot of reading, YouTube videos are waiting for me before I have the courage to start to print on it. Actually a 5l isopropyl alcohol I ordered for washing is not here yet. Also I may need some additional things to buy for keeping the whole thing clean.

I need to figure out soon, how to use this, as this little guy is eagerly waiting to be printed out:


Actually a few years ago I bought a Parkside column drill at Lidl. I'm not really happy with it from various reasons. Now here is the replacement:


I thank for my family those things. I'll get good use of it.


2022. december 25., vasárnap

Project - Videoton R4900 Melodyn 2.


Originally I was planning to write the series of articles about the build, what eventually didn't happen. I'm writing it now (on 25th December), for sure, many things will be missing.
This will be more series of pictures than a build log.

This is how it looked like at arrival:


I didn't even touch the radio until July. Just ordered a few parts:


This never be a "Hi-Fi" equipment, so a $1.75 class-D power amplifier and four wide range speakers are good enough. According to my plans, I also added two SMPS power supplies a 24V and a 5V one (later even I had in one of my parts boxes already)

Disassembly

I throwed away everything I didn't need, to have place for the new things installed. My intention to keep only the things inside, what doesn't change the look and feel.


Removed the complete power supply section, the power amplifier and all of the tubes.


Also removed the front cover with the original textile and the loudspeakers.

Power amplifier/loudspeaker section


The textile was cracked and the whole wooden plate wasn't fit to my new speakers, so recreated from starch. Added two wooden plate instead of the original one. One for the front holdinging the textile, one for the back for the speakers.


Drilled the holes for the speakers.


The amplifier/speaker section assembled.


Glue the textile to the new wooden plate


Put back the original (plastic) frame


Assembled

Additional small things

I wanted to keep a few things from the original. The power switch, the volume knob, the backlight.
I guessed the backlight will be hard to find. Originally an E10 6.3V lamp was used (connected to the tube heater winding of the power transformer).
I was absolutely sure, I'll never find an E10 24V LED lamp:
AliExpress: - Hold my beer!

Changed the volume potentiometer to a new stereo one. Didn't find the one with the same length and finishing shaft. Bought some plastic extensions from the AliExpress, needed some work on it. Finally I was able to apply it correctly (no photos, sorry)
The power switch give me some headache. The original one was just partially working. Disassembled, but unable to fix it. So I crafted something into its place, what is not nice, but working (didn't have access to my 3D printer at that time, to create something better):


Controller

The controller should consist a Raspberry Pi (actually I had a few 3B, so used one), and a touch screen. Looked around, and from the reviews I choose a WaveShare 5" IPS, DSI, capacitive touch display (https://www.waveshare.com/product/raspberry-pi/displays/lcd-oled/5inch-dsi-lcd-b.htm).


It come out, just perfect. Worth every cent payed for it. Connected to the RPi with already installed RaspiOS, it just started to work. No software tweaking, no alignment, nothing.
From software perspective, I started from this project: https://learn.adafruit.com/raspberry-pi-radio-player-with-touchscreen
It gave some background on the mpd/mpc, but I didn't like the frontend (so rewrote it).
Other than installing the mpd and mpc, I only needed to setup the /etc/mpd.conf, with this configuration:

audio_output {
        type            "alsa"
        name            "My ALSA Device"
        device          "hw:0,0"
}

The others are handled by the Python code written. You also need this three Python packages: numpy, pygane, PyYAML

Controller mounting

Designed a mounting frame, what give the feeling of the original speaker grill, but can be opened to prevail the controller.


For the door lock I used the spring lock what can be used on many consumer electronics devices


The final assembly


The design, source code, etc. can be find here:
https://gitlab.com/suf/suf-electronics-melodyn

I'm thinking about, to create a "spin-off" project from the Python code and create a full blown network radio + media player from it. But this is question of the future...

Project - Videoton R4900 Melodyn 1.

This was written at 2022.04.14. Publishing it today as the surprise is over.
When I was a little child (before we bought out first Hi-Fi equipment in '81) we had a Videoton Melodyn radio. It is not particularly rare, or high quality. It just a radio from the bad side of the iron curtain.
Two days ago popped one of it on a Facebook group. It is sold on the local auction portal Vatera for an insane low price. (The picture is for illustration from www.radiomuseum.hu and not the actual unit)


I got some nostalgic feeling on it. I was thinking to buy it.
When I finally get the idea, what to do with it, it was already sold. 😔
Actually somebody had a comment under the original listing, that he has one and wasn't able to sell it for months now.
I contacted him, and today (2022.04.13) I picked it up. Payed $10 for it, and it was located in the neighboring district (not at a village at the other side of the city as the original listing's unit).
So the plans:
Actually my mother frequently listening some internet radio on the PC in the kitchen. It would be a great idea, to build an internet radio capable device for her into a familiar case (I just hope she remember to this radio and build some sentimental feelings on it). I plan to give her (and for my father) as Christmas present this year.
The plan in nutshell, how I see it now:
Add a Raspberry PI (I have currently a 3B unit in the drawer, don't intend to by a 4B in this chip shortage times for a fortune), buy a touchscreen LCD, a small but powerful D class amp, two new wide range loudspeakers.
Remove the original loudspeaker what mounted partially behind the left side plastic cover (next to the radio scale) and the upper textile cover. Mount the plastic cover to some kind of hinge, lock with "push to lock" plastic unit. Mount the LCD behind this newly created door. Mount the new loudspeakers exclusively behind the textile.
Find some internet radio linux distribution for the Raspberry, add PSU, the amp and that's it.
My mother eventually read my blog. Therefore this post was written for the drawer. I publish this (and the later parts) after Christmas.

2022. november 23., szerda

"Hack" the car, PoC

I just got a new car. It is a VW Passat Variant. As such the back hatch opens upwards and the handle become very high to my two daughters. They are unable to close it.
I was thinking, how to handle this, without modifying the car itself. If I just tie something there, it would hang outside the car, what is a bad idea.
So, two velcro strips and a dog leash helped.


The girls can pull the door down, while the dog leash automatically winding itself into the handle.
I'll go to an animal shop and by a proper one. This expected back by Bruno.

2022. november 19., szombat

Shielded audio cable from the store

I'm wiring an audio equipment right now.
Not a high quality one, and as it use internally a Raspberry PI, I wanted to use its audio jack connected to the volume control potentiometer.
It was easier to cut a regular shielded audio cable, with plugs than assemble a 3,5mm jack.
Cut, surprise:
No comment...

2022. október 2., vasárnap

Back to Exchange - sort of...

Who know me from the past, on my professional side knows that I used to be a Windows guy. Working mainly with Microsoft Exchange and Active Directory as administrator, designer, time-to-time programmer.
Those days are passed. Today I mostly working with Linux as a DevOps in cloud. I changed the Exchange Management Shell, Transport Agents, Management Consoles to CI/CD tools, IaC, Azure, AWS, git repos, artifactories, Kubernetes, and many more.
Most of the times I'm working for a single entity as employee or contractor. On the side of this eventually I have customers of my own.

Back in 2019 I built a solution for one of my own customers, to download e-mails from Office 365 to a folder via POP3. I used Linux, getmail (using POP3) and samba for it. Actually it was a second incarnation of a previous project doing the same in Microsoft Exchange, with a transport agent (the transport agent concept was removed in Office 365).
A week ago, my friend who took over the role of the external consultant at this company called me, that even he warned those guys months ago, they didn't take a step. The issue is that Microsoft disable the basic authentication on POP3, IMAP4 and SMTP (https://learn.microsoft.com/en-us/exchange/clients-and-mobile-in-exchange-online/deprecation-of-basic-authentication-exchange-online).

Asked me to resolve it. This means, the authentication need to be switched from basic to oauth2
Here is the finally working solution. I had some issues needed to resolve during the journey. I will manly left out the detours, to keep the description clear. I done this on an Ubuntu 18.04LTS (the upgrade wasn't on the list this time)

1. The software
The original getmail exists as a package in the Ubuntu, doesn't support oauth2, so it need to be replaced:
Remove the current getmail:
sudo apt-get purge getmail
The getmail6 (https://getmail6.org/) what is a fork of the original getmail and support oauth2 is a python3 package. Even the python3 is part of the base installation of the Ubuntu, the pip is not:
sudo apt-get install python3-pip
With the pip3 we can install the getmail6:
sudo pip3 install getmail6

2. Azure setup
We need an Enterprise Application for logging in with oauth2 to the Exchange online (the description here is based on the description in the getmail6 documentation https://github.com/getmail6/getmail6/blob/master/docs/getmailrc-examples).
Login to the azure console (https://portal.azure.com/) - don't be afraid if you never used it. It will let you in with your Office 365 account.
Select Manage Azure Active Directory (use the search if needed)
Select App Registrations
Select New Registration
Enter a project name, eg "getmail".
Select Accounts in this organizational directory only (Single tenant) from Supported account types
For Redirect URI type, select Web - missing from the getmail6 documentation
Enter http://localhost for Redirect URI
Select Register
From the Overview page take a note of the Application (client) ID and the Directory (tenant) ID.

Next create a secret by selecting Certificates and secrets
Select New client secret
Description: password
Expires: select preferred expiry date
Make a note of:
client_secret
It is available by selecting Value - Be aware! You can see this only once. You can't get the value after you navigate off this page ever.

Next add permissions:
Select API permissions, then Add a permission.
Select Microsoft Graph
Select Delegated permissions
Select the following permissions:
- IMAP.AccessAsUser.All
- POP.AccessAsUser.All
- SMTP.Send
Select Add permissions

3. Create authentication json
We need an autentication json file, will be used by the getmail. We need this on the linux machine, to be present. This also need to be writable by the user running the getmail as the content also managed (and frequently canhged) by the getmail. I called it o365,json, but it is up to you:

{"scope": "https://outlook.office365.com/IMAP.AccessAsUser.All https://outlook.office365.com/POP.AccessAsUser.All https://outlook.office365.com/SMTP.Send offline_access",
  "user": "<Office 365 user (email)>",
  "client_id": "<client_id>",
  "client_secret": "<secret>",
  "token_uri": "https://login.microsoftonline.com/<tenant_id>/oauth2/v2.0/token",
  "auth_uri": "https://login.microsoftonline.com/<tenant_id>/oauth2/v2.0/authorize",
  "redirect_uri": "http://localhost"}

The <Office 365 user (email)>, <client_id>, <tenant_id>, <secret> need to be replaced with the text you previously noted.

4. Setup Azure AD connection with your json
I'm using an Ubuntu vm without gui (headless), setting up everything from my Windows desktop. This step according to the getmail6 documentation, need a browser running on the same box where the getmail is installed, what doesn't exists.
The problem is that during the authentication process in the browser, call back to the getmail authentication backend, in our case to the http://localhost (specially to the 8083/tcp port). As in our case the machine running the browser, and the machine running the getmail, two different boxes, we need to do some tricks to resolve it.
Making the Ubuntu box available on the network will not easily resolve the issue as the Azure AD app registration only allows unencrypted http for the localhost. Any other cases you would require a TLS certificate on the Linux box, and my best guess, some modification in the getmail's python code also.
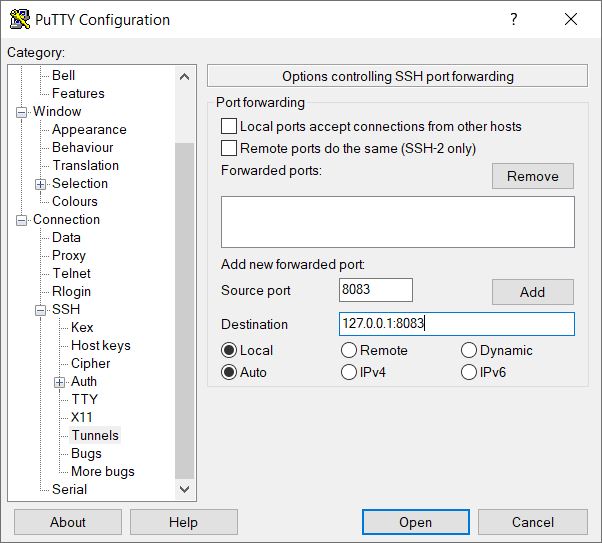
I'm using PuTTY terminal emulator accessing the Linux box.
What I done the resolve this problem, that I redirected the 8083 port of the remote Linux to my Windows machine.
Open the PuTTY
In the Category box under the Connection expand SSH
Select Tunnels
Into the Source port write 8083
Into the Destination write: 127.0.0.1:8083
Select Add
In the Category box select the Session
Type the Host Name as usual and select Open.

5. Execute Azure AD connection
After logged into the Linux box, we need to execute the following:
getmail-gmail-xoauth-tokens --init <full path of the json file created>
This give back an URL what need to be copied into a browser. After the Office 365/Azure login we get a Permissions requested screen, what need to be accepted.
This call back to the Linux box and insert the security access tokens to the json file created previously. The security link between the getmail and the Office 365 now established

6. Setup the getmailrc file
We need to create a getmailrc file (a text file with a name of your choice placed to the .getmail folder)
The retriever session need to look like this:

[retriever]
type=SimpleIMAPSSLRetriever
use_xoauth2 = True
server=outlook.office365.com
username=<Office 365 user (email)>
password_command=("getmail-gmail-xoauth-tokens", "<full path of the json file created>")

Note:
At the time of writing the SimplePOP3SSLRetriever throw an error while try to access mail, so we should stick to the SimpleIMAPSSLRetriever.
For the other sections and further configuration, running, scheduling the getmail consult with the documentation, as it is out of the scope of this article.

2022. szeptember 25., vasárnap

Analog meter resistor sizing

Yesterday surfaced a question regarding sunt and resistor divider sizing for analog panel meters.

Actually I was a bit rude, while answering as I feel, that if somebody unable to calculate a sunt or a resistor divider for a panel meter, not the best idea to start to repair audio amplifiers.

Anyway, I think, I need to apologize for this. If you jump to electronics, you need to start somewhere.

The question: calculate a divider for 15V and a sunt for 30A. As we figured out, it needed for two unknown meters.

To replicate the problem, I picked an analog meter from my own parts collection, to show, how to do this.

First you need to know the parameters of the meter. Specially you need two things:

The DC resistance of the meters coil

The current needed for the full scale

First, I measured the DC resistance. Yes, I know, it is not a gentile thing to directly connect a panel meter to an ohm meter, but it probably will not kill it, and we will have the figure needed:


For measuring the current needed for the full scale you need a power supply (or some kind of battery), an amper meter able to measure in sub mA range, the meter to be measured and a potentiometer. For sizing the potentiometer you need to take into consideration that the analog meter (Deprez) itself usually in 20-100uA range.

I choose a 10k potentiometer. The meter in question is a 100uA one (you need to guess for the first measurement, what you have), the 10k + 1.15k according to Ohm's law will give us 1.15V (U=I x R, 0,0001 A x 11500 ohm).

Connect the panel meter, the potentiometer, your own amper meter in series to the power supply. Set the power supply to a lower voltage what you calculated above, and turn the potentiometer into the highest settings before you switch it on. If your power source has current limit, set it to let say 1mA, or the lowest possible setting to protect you meters, just in case of any error.

The result: R = 1150 ohm, I = 90mA (we don't need more precise than this as the meter itself have far bigger error than our rounding)

When it is done, switch it on and turn the potentiometer until you read full scale on your analog meter:


Now we have the values needed for the divider and sunt calculation.

So the divider. I choose 20V scale. For this you need a series resistor to the meter. Back to Ohm's law:

R = U/I, 20V / 0,00009A = 222.222 ohm

Subtract the coil resistance give 221.072 ohm. I choose a 220k resistor, just to show the result:


(the resistor need to be connected to the meter in series obviously)

Next - current measurement (it is easier to calculate this way):

I choose 1A full scale (I neither have a 30A capable supply nor appropriate sunt, so 1A is good enough for the calculation) We need the voltage drop across the meter at full scale: U=I x R, 0,00009A x 1150 = 0.1035 V.
From this the sunt would be R=U/I, 0.1035 V / 1 A = 0.1035 ohm
(Yes, I left out the resistance of the coil from the calculation, but the effect of it negligible)

I choose 0.1 ohm resistor, what I have:


Actually, we are done.

The thing above is not calibrated. To create a good meter, you need to do a minimal adjustment to get as precise result as possible.

For voltage measurement choose a slightly bigger resistor than calculated, and place a 10 times bigger 10 turn trimmer in parallel with the drop resistor before you connect in series with the meter. With this you can adjust the meter (yes I know, it is not the best possible solution, but good enough for this)

For the current measurement, choose a slightly bigger sunt resistor and connect a trimmer in series with your meter before connecting it in parallel with the sunt for adjustment.