2021. december 22., szerda

Measurement Control - Direction

Things are changing.

When I restarted my instrument control projects, I had a clear path ahead of me. Then I realized a few things, have to rethink the whole project, my view on it.

I found this project: https://github.com/xyphro/UsbGpib

This is exactly, what I need. I'm 90% sure now, that the firmware I developed for my own board is needless (issues can surface, when I try to adopt it to my hardware and software ecosystem, but it is highly unlikely).

My control software has an additional layer above the VISA. I was thinking to eliminate it, but figured out that I have some instruments on hand what uses HID, or proprietary USB based protocol, what I can't put under the VISA umbrella.

I have a big dilemma regarding the future development. I mean the desktop application of the measurement control.

The situation:

In the software development today is everything about the mobile, web and cloud. It is clear, the word is going to this direction. Even myself as a DevOps professional working on cloud based web projects for several years now.

But...

Always this disturbing "but".

But the instrument control in my hand is a bit different. What I see and feel, the instrument control, visualization applications are mainly not built around web technologies. Those are still desktop apps. I don't want to change this. It is more convenient to use this applications, easier to communicate directly with the hardware, etc.

I started to develop it in C# on .NET Framework with Visual Studio using WinForms. This platform where I have the most experience. If I keep my lazy attitude on it, I can keep it this way and just forget my dilemma. Actually I develop it to myself, so I not really need to care about it.

But something is itching in my mind. The technology above is getting outdated. I also use those projects for learning. So the question is: Which direction?

The other driving factor is Linux. Should I create a multiplatform app? For myself, not necessary. If others want also to use it, that is a requirement.

So the options I see now:

  • Keep this, continue the development and just forget it?
  • Move to the .NET 6, WPF, MVVM to have a never platform? This means no Linux support, the only thing I can hope, that somebody create a usable version of the MAUI on Linux.
  • Move to .NET 6, and use some 3rd party UI (Avalonia or UNO Platform, QT, whatever)?
  • Just forget the complete C# and .NET ecosystem and move somewhere else?
    • Python has PyVISA for instrument control. I not really like Python, and still need to find a UI
    • Java has desktop frameworks, but what to do with the instruments?
    • Node.js has Electron, but the VISA support libraries questionable.
    • Any other direction didn't pop to my mind?

I try to collect (at least partially) the requirements:

  • Native desktop application
  • Hardware communication (Serial, USB-HID, IVI stack like Keysight IO Library Suite, USB-TMC, etc.)
  • GUI elements - Dialogs, Data Grids, Text controls, and most importantly charts
  • Pugin architecture (the pugins for the instruments, communication platforms should be handled separately, need to be expandable)
  • Network handling
  • File system handling

Maybe there are more requirements. These ones I can see now.

So, If you have thoughts on this, please share with me! 

2021. december 5., vasárnap

USB-GPIB Interface v2.1


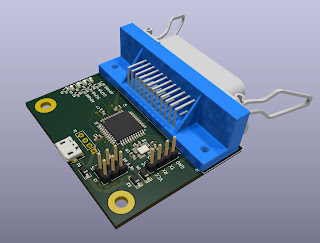
This is a small upgrade, bug fix of my previous ATMEGA32U4 based USB-GPIB interface. The previous had some flows. It had collision between the bootloader LED handling and the GPIB signals. Completely mixed up the original Arduino signals to be able to use the interrupt handling of the processor. Also used a full 8 bit port for the data bus to be able to read/write once and not bit by bit.

  • For this version I chose a bit different view:
  • Try to stick to the original Arduino Leonardo pin configuration as much as I can
  • Give up the interrupt handling except for SRQ line
  • Kept the 8 bit data bus
  • Made it configurable - you can choose between the pin config used by the AR488 project and the 8 bit data bus above (the AR488 version doesn't need custom bootloader)
  • Keep the capability of the using the activity LEDs
  • Added serial debug port

Later this design will be based on this adding the proper GPIB line drivers. This design is only capable to drive one instrument (maybe good for more, but I rather not try).

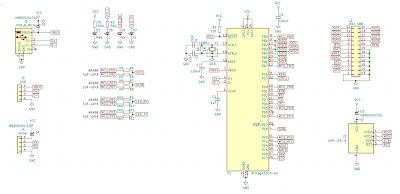
The schematic:

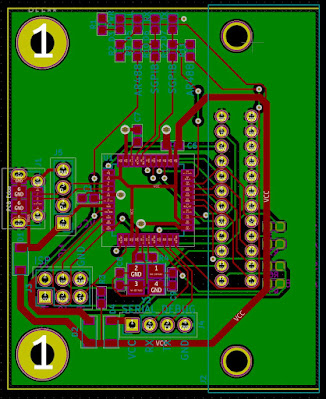
The PCB design:


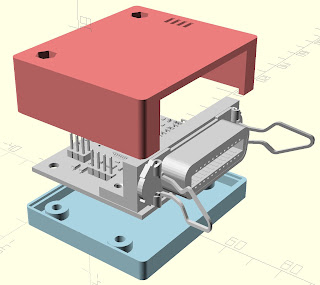
The "exploded" 3D model:


Yes I know that the gender of the connector is not the correct on (but who knows today, what gender is appropriate), but I didn't find 3D model of it and It wasn't so important, just to represent the size for model design.
Here you can find the complete design:
With this design the number of finished designs in the group is rise to two so here is the time to order the PCBs.


2021. december 3., péntek

New workshop

Finally it is official. It was a big fight with the bureaucracy at the local municipality to achieve this. I've a new workshop. It will be lot of money and work until I can move in (I expect a few month for this).


2021. november 30., kedd

USB-RS232 Interface


As implementation of my plan to continue to work on my measurement control solution, first I done the design of the USB-RS232 interface. It could be, that this is not the last version of it, but the design is done for now.

It is based on the CH340G chip what I used for my ESP8266 programmer with great success, also have it in various chinese USB-Serial cables, Arduinos, 3D printer boards and almost never had a single problem with it. To achieve the proper signal level I added an MAX232 to it.

Probably this solution is not optimal as it is lack of all of the RS232 signals, but I think it is good enough for now (I don't want to put much more effort into it for now).

The schematic:


The PCB design:

As you may realize from the schematic and the PCB, it has a "dual" USB connection. It means the USB signals are exists both of an micro USB connector and a pin header. This solution give the versatility to use the device with USB connector or soldered in cable.
According to this concept I designed two different enclosure.
With USB connector:


And with cable connectivity:


You can realize that the board color is gray on the exploded views above. The reason is that I wasn't able to import color 3D model to the OpenSCAD what I use for 3D modeling.
The original 3D view looks like this:


Currently I'm not planning to order the board yet because I want to panelize it with the next version of my GPIB hardware what I'm designing right now.

All of the design files you can find here:

Also as I planed reorganization of my measurement control things, all of the connecting repositories will appear here:


2021. november 27., szombat

Measurement Control - reboot

Preface

In the recent years I put substantial amount of work in controlling my various instruments from computer. The goal is to achieve some added values, like logging, better visibility, more functions, etc.
Looks like I a bit failed with this, as none of the things reached the usability state.
Even I put aside the thing months ago. Now I feel the need to restart the project and achieve some "working" result.

Plans

Reorganize the source repositories

This is needed as I learned many things in the recent years from my work on git (branching strategies, release management, etc.)

Create an USB-RS232 interface

I've a few devices using RS232 interface instead of (or on the side of) GPIB. Yes you can buy USB-Serial interfaces for nuts. Why you need another? Most of the things you can buy has no proper signal levels. They use TTL levels instead of RS232 levels. Most of the professional instruments require proper levels. The interfaces with proper signal levels are not cheap or you risk buying something on Aliexpress what states it correct, when not.

Redesign USB-GPIB hardware

My ATMEGA32U4 based interface working perfectly. In the recent years I realized a few things regarding to it, what feels like some adjustments are needed:
  • Create a physical design what can be mounted a 3D printed enclosure
  • Abandon the unnecessary connectors added for future improvements like display, additional device control, etc.
  • Add serial debugging capability (according to AR488)
  • Maintain bootloader compatibility with Arduino Leonardo
  • Also keep the advantage of using a complete 8bit bus of the MCU for data transfer (require modified bootloader
  • Maintain software compatibility with AR488 (https://github.com/Twilight-Logic/AR488)
  • Add activity LEDs (the original Arduino Leonardo has those)
  • Proper GPIB interfacing with TI chips (in a different HW version)
Maintaining AR488 compatibility doesn't mean I intend to drop the development of my own firmware. I still not a fan of the 3000+ lines of code in a single source file and the AR488 still doesn't support GPIB subaddressing. I've several instruments (VXI mainframes, power supply mainframe), what require subaddressing. On the other side it has device mode, TI GPIB chips support, what is missing from mine and support from software like sigrok.

Proper bootloader for USB-GPIB

I created a bootloader for the the v2.0 of my board. This was a result of an incident caused by reusing the USB activity LEDs of the Arduino Leonardo, killing my GPIB communication. The issue was resolved then, but the result is poorly documented (https://pakahuszar.blogspot.com/2020/04/gp-ib-5-v20-board.html), hard to reproduce and killing the activity LEDs instead of relocating them.
Now I'm trying to create a maintainable buildable, and properly installable solution. Also want to allocate a proper PID/VID from pid.codes

Power supply control software

My virtual instrument software is able to do many things but I realized it is too much for the first iteration.
There are many things already achieved with it, but for the reboot I want to have more realistic goal. So using the plugable driver support from it, I want to just create a power supply control software for my many supplies (even the HP 66000A mainframe is useless without software control as I don't have keyboard for it). I don't want to add higher functions yet.

Further...

Sure, I don't want to stop here, I want to reboot the virtual instrument software, my curve tracer, etc.
But those are cloudy right now, and if I lose my focus on it, this project tsunami will be shelved. Again.

2021. november 11., csütörtök

Terraform, Cloudformation and Cognito

Some things what more of my professional side than the hobby, electronics, maker things.

I'm working with IaC tools since... don't even remember. I started with AWS CloudFormation around 2014 (not sure, it is cloudy. 😆).


When I learned about Terraform, I had a fear, that I'll not get the full functionality of AWS. The CloudFormation is a native tool. Something developed by a 3rd party should fall behind the native tool of the provider.

I started using Terraform as the customer required it. So switching from Cloudformation to Terraform wasn't my decision. The fear I described above just become reality when the customer didn't wanted to upgrade the AWS provider in their deploy agents, so it wasn't the fault of HashiCorp or the Terraform community. Also, writing Terraform code is much more convenient, give you more capabilities on processing, converting the required information.

A few weeks ago, after three years exclusive Terraform work, I got a project what use CloudFormation again.

There was a - I guessed - super easy task. Publish the secret of a Cognito User Pool Client into an SSM Parameter Store value as Secret String.

In Terraform this would look like this:

// Create Cognito User Pool
resource "aws_cognito_user_pool" "pool" {
  name = "pool"
}

// Create Cognito User Pool Client
resource "aws_cognito_user_pool_client" "client" {
  name = "client"
  user_pool_id = aws_cognito_user_pool.pool.id
  generate_secret     = true
}

// Publish to SSM Parameter Store
resource "aws_ssm_parameter" "secret" {
  name        = "/production/cognito/clientSecret"
  type        = "SecureString"
  value       = ${aws_cognito_user_pool_client.client.client_secret}
}

And we are done.

Try the same in CloudFormation.

Can the AWS::Cognito::UserPoolClient object export the secret? Nope. Ref: https://docs.aws.amazon.com/AWSCloudFormation/latest/UserGuide/aws-resource-cognito-userpoolclient.html

Can the AWS::SSM::Parameter object create SecureString? Nope. Ref: https://docs.aws.amazon.com/AWSCloudFormation/latest/UserGuide/aws-resource-ssm-parameter.html

Here my previous theory on the "CloudFormation should be ahead of Terraform" fall.

I tried several things finally this was working (One small comment: the import cfnresponse is in a separate line. It is not because of my lazyness. It is because otherwise the infrastructure doesn't realize, the cfnresponse.py should be added to the zip as it is not a part of the pip repo):

Resources:
  # Create Cognito User Pool
  UserPool:
    Type: "AWS::Cognito::UserPool"
    Properties:
      UserPoolName: pool

  # Create Cognito User Pool Client
  UserPoolClient:
    Type: "AWS::Cognito::UserPoolClient"
    Properties:
      AccessTokenValidity: 15
      AllowedOAuthFlowsUserPoolClient: false
      ClientName: client
      GenerateSecret: true

  # You need a lambda to
  #     - read from the cognito user pool client
  #     - write to the parameter store
  #     - report back to the CloudFormation when finished
  CognitoSecretExporterLambda:
    Type: AWS::Lambda::Function
    Properties:
      FunctionName: CognitoSecretExporter
      Runtime: python3.9
      Role: !GetAtt CognitoSecretExporterExecutionRole.Arn
      Handler: index.handler
      Timeout: 30
      Environment:
        Variables:
          CognitoUserPoolId: !Ref UserPool
          CognitoUserPoolClientId: !Ref UserPoolClient
          ssmParameterName: /production/cognito/ClientSecret
      Code:
        ZipFile: |
          import boto3, os
          import cfnresponse

          def handler(event, context):
              CognitoUserPoolId = os.environ['CognitoUserPoolId']
              CognitoUserPoolClientId = os.environ['CognitoUserPoolClientId']
              ssmParameterName = os.environ['ssmParameterName']

              # Read Cognito
              cognito = boto3.client('cognito-idp')
              response = cognito.describe_user_pool_client(
                  UserPoolId = CognitoUserPoolId,
                  ClientId = CognitoUserPoolClientId
              )
              cognitoClientSecret = response['UserPoolClient']['ClientSecret']
              print(cognitoClientSecret)
              ssm = boto3.client('ssm')

              # Write to parameter store
              response = ssm.put_parameter(
                  Name = ssmParameterName,
                  Description = '[CF] Cognito Client Secret used by the WebApp',
                  Value = cognitoClientSecret,
                  Type = 'SecureString',
                  KeyId = 'alias/aws/ssm',
                  Overwrite = True,
                  Tier='Standard'
              )

              # Report success to CloudFormation
              responseData = {}
              responseData['Data'] = 120
              cfnresponse.send(event, context, cfnresponse.SUCCESS, responseData) 

  # Trigger the lambda from the CloudFormation stack
  CognitoSecretExporterInvoke:
    Type: AWS::CloudFormation::CustomResource
    DependsOn: CognitoSecretExporterLambda
    Version: "1.0"
    Properties:
      ServiceToken: !GetAtt CognitoSecretExporterLambda.Arn 

  # IAM Role for the lambda above
  CognitoSecretExporterExecutionRole:
    Type: AWS::IAM::Role
    Properties:
      RoleName: CognitoSecretExporterExecutionRole
      AssumeRolePolicyDocument:
        Version: '2012-10-17'
        Statement:
        - Effect: Allow
          Principal:
            Service:
              - lambda.amazonaws.com
          Action:
            - sts:AssumeRole
      Path: "/"
      Policies:
      - PolicyName: root
      PolicyDocument:
          Version: '2012-10-17'
          Statement:
            - Sid: EnablePutLogEvents
              Effect: Allow
              Action:
                - logs:CreateLogGroup
                - logs:CreateLogStream
                - logs:PutLogEvents
              Resource:
                - '*'
            - Sid: ReadCognito
              Effect: Allow
              Action:
                - cognito-idp:DescribeUserPoolClient
              Resource:
                - !GetAtt UserPool.Arn
            - Sid: ParamStore
              Effect: Allow
              Action:
                - ssm:DeleteParameter
                - ssm:PutParameter
                - ssm:GetParameter
              Resource: 
                - !Sub arn:aws:ssm:${AWS::Region}:${AWS::AccountId}:parameter/production/cognito/ClientSecret

2021. október 15., péntek

Gigabyte and modular power supplies

On the side of the CNC router project (as always) I started an other one. This is clearly just a PC project. Build a NAS from the things I have on hand (ceiling cleanup 😂).

During the long years, I used several - called modular - ATX power supplies. Those things allow you to clean up the cable jungle a bit, what always shown up inside the PC cases, by allowing you to detach unnecessary cables from the PSU. These are the peripheral cables used for the mass storage, graphics cards, etc.

The connectors on the supplies for the modular PSUs are not standardized, usually use the same kind of connector (2 row, 6 or 8 pin, Molex Mini-Fit).

Yes, I bought PSUs from different vendors (Gigabyte, Chieftec, etc.). Yes, I never labeled the cables. And yes, I keep those in one box. This means, I don't have a clue, which cable belong to which PSU.

For the NAS PSU I needed several cables (in hot swap bays, I plan to use 14 disks). If I mix those up, I can imagine the firework it can cause.

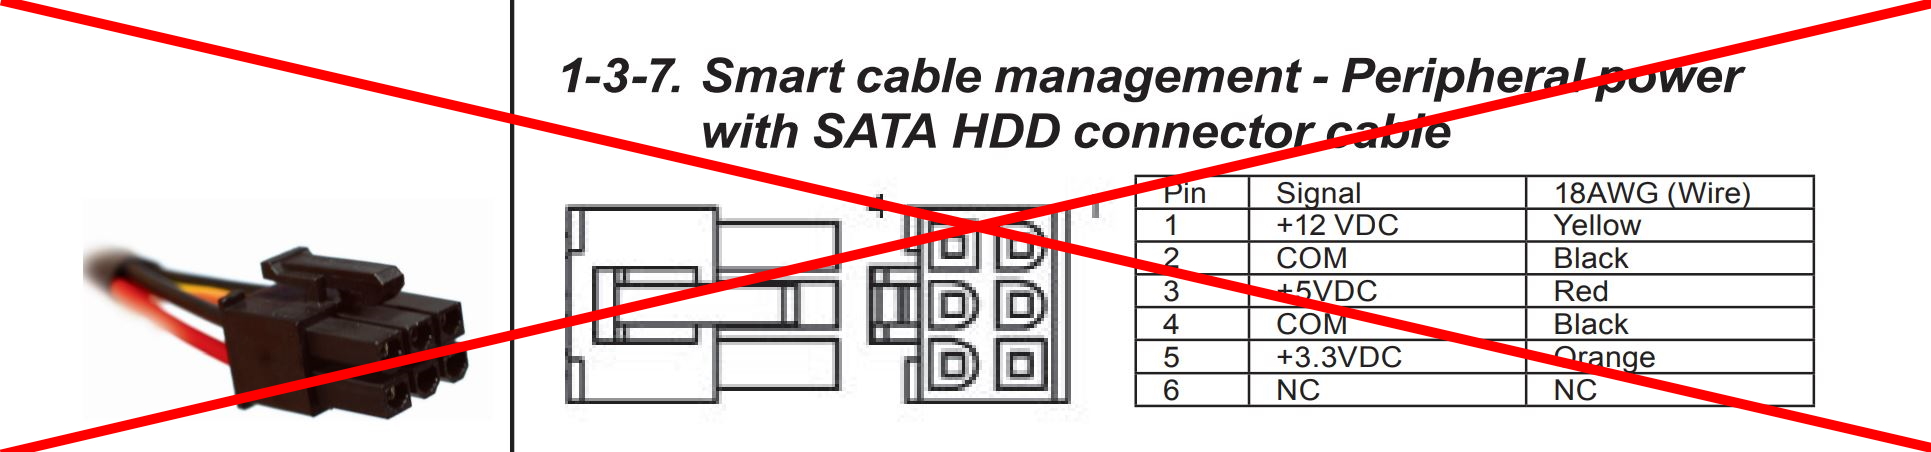
The subject currently is a 550W Gigabyte Odin (I also have an 800W somewhere just not found in the ceiling yet). I downloaded the manual of it. It has the connector pinout in question. (Indicated, not to use it as is bad)

I started to starch my head. None of the cables in the box has this pinout.

DMM on. Measure.

My suspicion become true. The manual is garbage.

This is the correct pinout (the connector drawing is from Molex and show the connector on the PSU itself), and it correspond to all of the cables in my box (it is maybe a coincidence, but Gigabyte, and Chieftec use the same pinout):