On the other side I must admit that it is evolved since my first encounter, and it looks like something unavoidable.
I need some remote sensors, actuators, for my OpenHAB system. I want to build most of them. As I looked around, I seen two easily usable solution:
- ESP8266 based WiFi modules
- MySensors.org NRF24L01+ and Arduino based mesh network
As I heard the LUA interpreter of it not really fits into bigger project, so I chosen the Arduino framework for it. Actually I'm just learning it, so I don't know where this lead to.
My first goal to be able to switch a GPIO of the ESP8266 via a HTTP REST API interface.
As I mentioned above I really hate the Arduino IDE. I run into various problems with it when I tried to configure and compile the Marlin firmware for my 3D printer. Then I found that you can use the trusted Microsoft Visual Studio (I'm using it for my daily work and a few contract projects) with this addon:
http://www.visualmicro.com/
for the task.
Putting together the environment:
1. Install an Arduino IDE. Can be downloaded from here: https://www.arduino.cc/download_handler.php?f=/arduino-1.6.8-windows.exe
2. Install the Microsoft Visual Studio 2015. I'm using the Professional version, but there is a free version, can be downloaded from here: https://go.microsoft.com/fwlink/?LinkId=615448&clcid=0x409
Make sure that you enable the C++ component
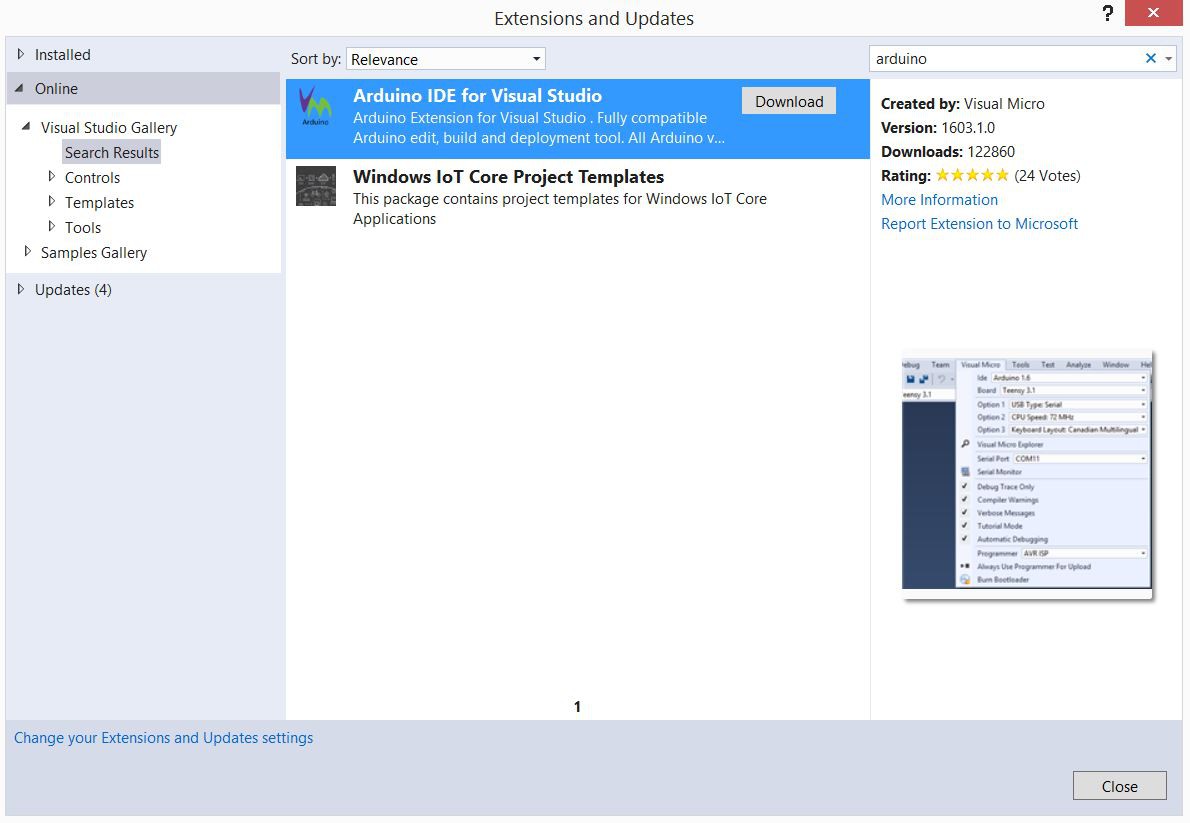
3. Start the Visual Studio. Go into the Tools/Extensions and Updates menu. Select the Online in the left pane. Search for Arduino
Download the Arduino IDE for Visual Studio
Install it, and restart Visual Studio as instructed.
4. After restart the Arduino configuration will appear. You should set the Arduino IDE location and add the ESP8266 Board Manager URL: http://arduino.esp8266.com/stable/package_esp8266com_index.json
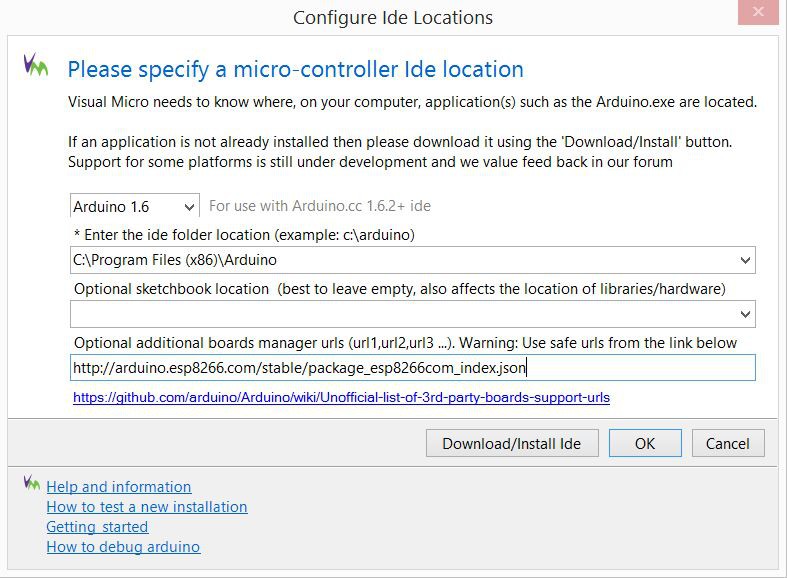
Press OK
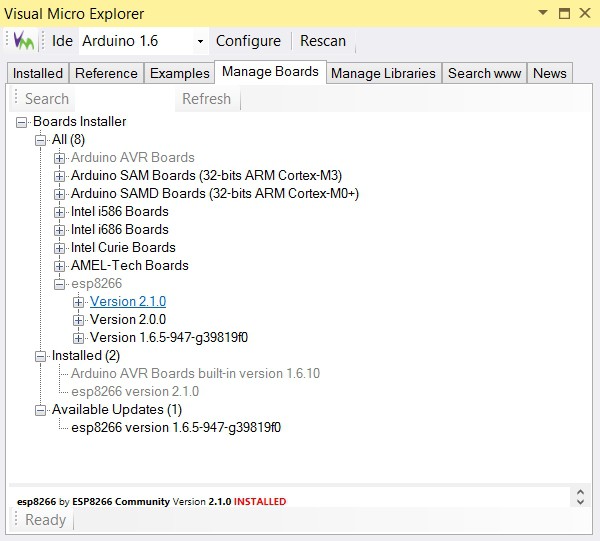
5. On the menu bar next to the Arduino board selector click on the magnifying glass icon
select the Manage Boards tab
Expand the esp8266 and click on the Version 2.1.0
On the popup dialog Click OK for the installation
And this is the point where I run into a great trouble. My machine is part of a domain, I'm running things as a regular user, means I've limited permissions (of course I'm admin on the other side, but I should specify it when I need it). It looks like the installer have a bug. Because I'm domain member and when I installed the machine at the beginning the user name I gave is the same I use in the domain. The result of this, that my profile name in the c:\Users folder is looks like this: <username>.<domainname>. This caused no problems in the past, but not here. The installer converted the dot between the name and the domain to underscore in some places and gave me an access denied error - yes because the folder in question didn't exists and I've no right to create it.
So I created the folder as admin and granted permission for me. After this the install run smoothly, but when I wanted to compile my first code, it failed. The error message wasn't too informative. After several trials, even using Process Monitor (Microsoft, formally Sysinternals tool), I was able to copy the files left in the temp folder under the underscore user folder I created, back into its place. Now it works, several hours wasted.
6. Try this out
I wanted to have a fast test, so I just created a demo project. The blink from the Visual Studio project list.

After selecting the correct board (NodeMCU v0.9 in my case) and the serial port, just uploaded the code and it started to work.
It looks like the ESP8266 environment is ready for more complicated tasks.
Make sure that you enable the C++ component
3. Start the Visual Studio. Go into the Tools/Extensions and Updates menu. Select the Online in the left pane. Search for Arduino
Download the Arduino IDE for Visual Studio
Install it, and restart Visual Studio as instructed.
4. After restart the Arduino configuration will appear. You should set the Arduino IDE location and add the ESP8266 Board Manager URL: http://arduino.esp8266.com/stable/package_esp8266com_index.json
Press OK
5. On the menu bar next to the Arduino board selector click on the magnifying glass icon
select the Manage Boards tab
Expand the esp8266 and click on the Version 2.1.0
On the popup dialog Click OK for the installation
And this is the point where I run into a great trouble. My machine is part of a domain, I'm running things as a regular user, means I've limited permissions (of course I'm admin on the other side, but I should specify it when I need it). It looks like the installer have a bug. Because I'm domain member and when I installed the machine at the beginning the user name I gave is the same I use in the domain. The result of this, that my profile name in the c:\Users folder is looks like this: <username>.<domainname>. This caused no problems in the past, but not here. The installer converted the dot between the name and the domain to underscore in some places and gave me an access denied error - yes because the folder in question didn't exists and I've no right to create it.
So I created the folder as admin and granted permission for me. After this the install run smoothly, but when I wanted to compile my first code, it failed. The error message wasn't too informative. After several trials, even using Process Monitor (Microsoft, formally Sysinternals tool), I was able to copy the files left in the temp folder under the underscore user folder I created, back into its place. Now it works, several hours wasted.
6. Try this out
I wanted to have a fast test, so I just created a demo project. The blink from the Visual Studio project list.
After selecting the correct board (NodeMCU v0.9 in my case) and the serial port, just uploaded the code and it started to work.
It looks like the ESP8266 environment is ready for more complicated tasks.
Nincsenek megjegyzések:
Megjegyzés küldése