A következő címkéjű bejegyzések mutatása: Linux. Összes bejegyzés megjelenítése

2024. december 4., szerda

WSL Idiocracy 1. - Check if installed

Currently I'm writing an automated install script for Azure DevOps self-hosted Linux agent running inside a WSL2 environment on my local Windows machine. Yes, I know the idea itself is weird in the Microsoft's ClickOps word, but I'm a DevOps engineer so I will force it to work.
On the road achieving it there is some idiotic ideas of the WSL what I want to write about.

My first thought, you can check the WSL installation status from in the Windows features list. It can be achieved from PowerShell:


Just guess the WSL is installed on my PC, or not!
According to the DISM it is not installed.
But if I list the running Linux systems:


My WSL based AZDO agent is already running.
How this is possible? The DISM is not the only way to install WSL. You can install it with the following command:

wsl --install --no-distribution --web-download

The internet sources suggest to use wsl -l -v but that just show the running Linux instances. If you install it with the command above, the list will be empty.
What I figured out is the following:

$WSL_STATUS = wsl --status
if($WSL_STATUS) {
    Write-Host "WSL already installed"
} else {
    Write-Host "WSL not installed"
}

Why? The status will be empty if not installed and will report the WSL default version and other settings if installed.
Why this is required? The installation of the WSL engine itself require reboot. As I'm writing an automated script it is crucial to know if I need reboot or not.

Continued...

2022. május 7., szombat

Octoprint in docker

[Updated: 2024.03.10]

This is just a short title of this article. I would rather call it: "Octoprint in those chip shortage times"

Today it is not so easy or cheap to acquire a good platform for Octoprint. Raspberry Pi almost seized to exists. If you can buy it somewhere it cost a lot.

I'm a DevOps guy nowadays for profession. I fell in love with the containerized (and orchestrated, cloud based iaC) infrastructures. The Octoprint is a good candidate for this, as itself is unable to handle more than one 3D printer.

Actually I've several tasks in the lab, what need server side background computing. So, I just picked up an old (not too old) PC from my ceiling (the most important requirement to have a 64bit CPU already).

Installed a shiny new Ubuntu 22.04 LTE Server on it. There is only thing I installed during the setup process: OpenSSH. I don't install Docker from snap, what suggested by the install process. It caused problems to me, so I leave it out for now.

At the first login I switch to root console (sudo su). I do this for comfort. I asked for password once during this process.

Docker

Install docker from docker's repository (instead of Ubuntu)

curl -s https://download.docker.com/linux/ubuntu/gpg | gpg --no-default-keyring --keyring gnupg-ring:/etc/apt/trusted.gpg.d/docker.gpg --import
chmod 644  /etc/apt/trusted.gpg.d/docker.gpg
add-apt-repository "deb [arch=amd64] https://download.docker.com/linux/ubuntu $(lsb_release -cs) stable"
apt update
apt install docker-ce docker-ce-cli containerd.io
apt upgrade -y

Note: If you run it on Raspberry PI the [arch=amd64] should be changed to [arch=arm64]

Static IP

I suggest to fix the IP address of the machine some way. Right now I'm using a pathetically shitty router from the provider, but at least it is able to add static lease to the DHCP service, so I choose this. On the other side I'm not so fortunate with it's DNS service. So with the naming I'll relay on the host file and not a DNS.

Proxy

I'd like to be able to access the services with name, instead of IP address and port. To be able to achieve this, the first thing I install is the jwilder/nginx-proxy, what I use frequently for this task

docker run -d -p 80:80 --restart=always --name=proxy -v /var/run/docker.sock:/tmp/docker.sock:ro jwilder/nginx-proxy

[Update]
After installing everything when I tried to use Octoprint, this came up at upload printable gcode:
The reason: the proxy is not configured for long HTTP requests. Means the start command for the proxy above need to be adjusted a bit.
You will need the following:

mkdir -p /data/nginx-proxy
chmod -R 777 /data
echo "client_max_body_size 25m;" > /data/nginx-proxy/custom.conf
docker run -d -p 80:80 --restart=always --name=proxy -v /var/run/docker.sock:/tmp/docker.sock:ro -v /data/nginx-proxy/custom.conf:/etc/nginx/conf.d/custom.conf:ro jwilder/nginx-proxy

Portainer

As I'm using mostly command line to manage docker, it is a good idea to have a kind of dashboard to see, what is happening. I'm using Portainer for this for a long time now. Here is the first time when it advisable to have a folder, or a named volume on the host to map as data into the container. Here I choose a folder for this. It will allow me later to mount some external storage (NFS in a NAS device in my case) to hold and backup this data.

So just add some folder for it (we will need one for Octoprint also, so I create it here also):

mkdir -p /data/portainer
mkdir -p /data/octoprint-geeetech

For security it is not the best choice, but as right now we don't know the user id of the Portainer  (Octoprint) container, so I gave access for those data folders for everybody inside the computer

chmod -R 777 /data

Install the Portainer:

docker run -d -e VIRTUAL_HOST=portainer.it-pro.local -e VIRTUAL_PORT=9000 --name=portainer --restart=always -v /var/run/docker.sock:/var/run/docker.sock -v /data/portainer:/data portainer/portainer-ce

Now try out if our Portainer is working. You need to add the Portainer in the name resolution in some way. Either as a CNAME record to the DNS or the host file in your client machine. In my case it is the later one on my Windows machine (c:\windows\system32\drivers\etc\hosts)

This case I add the following:

192.168.0.10    portainer.it-pro.local

From your browser you can connect to the Portainer and setup your user:

Device file

If you connect more than one USB-CDC device (Serial over USB, most of the 3D printers fell into this category), you are in trouble. In Linux the devices are not stick to the device file. While you run a single Octoprint on a Raspberry Pi this is not a problem, while you only connect one printer, always get the same device file. In our case it is not evident. This is why I use a "trick" here. Create an alias (soft link) for the device. Giving a name to it, based on the USB Vendor Id (VID), Product ID (PID), and the serial number. Here I should give a small note. The CH340 series Chinese USB Serial converter chip frequently used in the 3D printers, can't be differentiated from each other, as it has no serial number. So if you have more than one 3D printers based on it, you still in trouble.
First connect your printer to the PC, and run the following command:

lsusb -v

This will give back all of the parameters your device have. You can collect the VID, PID and the serial number from it.

My printer report this:


Based on this, you can add the creation of your device alias to the udev rules:

echo 'SUBSYSTEM=="tty", ATTRS{idVendor}=="0403", ATTRS{idProduct}=="6001", ATTRS{serial}=="A903RZMJ", SYMLINK+="ttyGeeetech"' >> /etc/udev/rules.d/99-usb-serial.rules

Reload the rules:

udevadm control --reload-rules

You can check with ls -la /dev/tty* if the device file is in it's place

The udevadm command wasn't work for me (probably disconnecting and reconnecting the printer does the trick), so rebooted the machine, what resolved it:


Octoprint

Last piece of the puzzle is the Octoprint itself:

docker run -d --restart=always -v /data/octoprint-geeetech:/octoprint --device /dev/ttyGeeetech:/dev/ttyACM0 -e VIRTUAL_HOST=geeetech.it-pro.local -e VIRTUAL_PORT=80 --name octoprint_geeetech octoprint/octoprint

One additional line added to the hosts file:

192.168.0.10    geeetech.it-pro.local

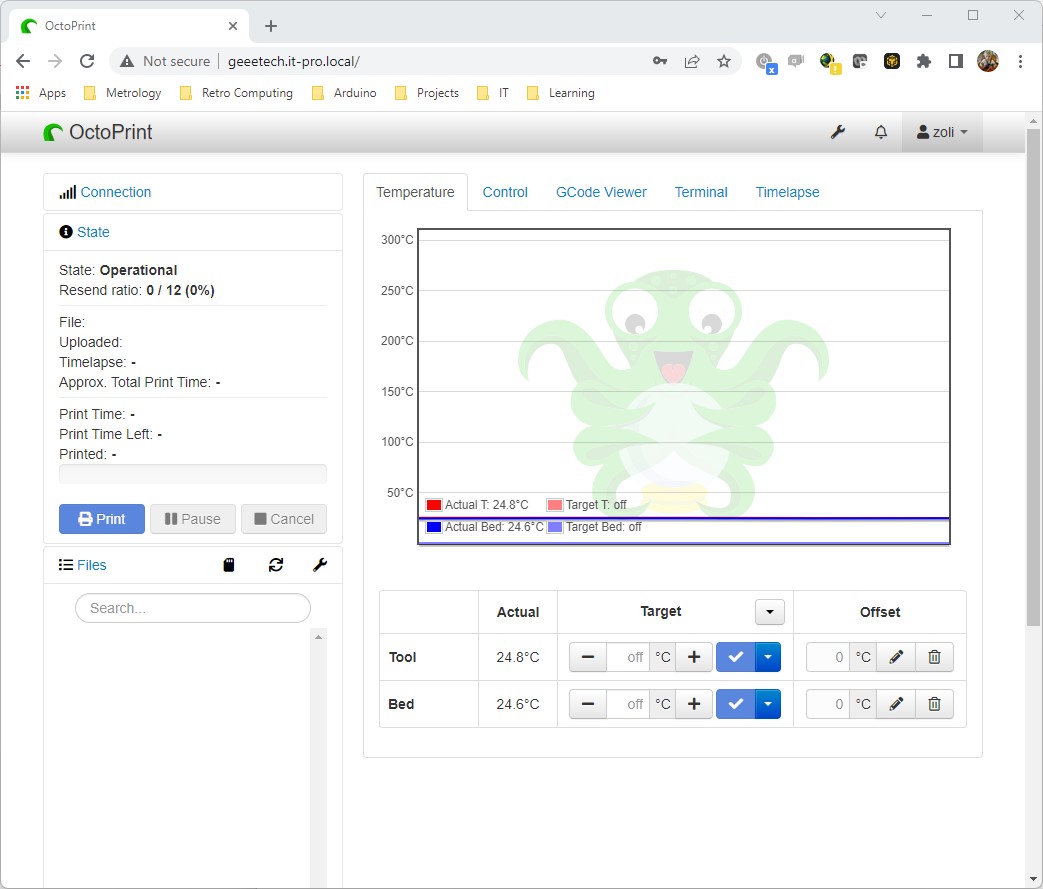
Now you can connect to the Octoprint from your browser:


Here come the regular Octoprint setup (I don't want to discuss it here because you can find this in more appropriate places over the internet).
And the result:

If you want to use more than one printers, you should setup the folder (for the octoprint instance), the sticky device file and the Octoprint docker container for each.


2017. augusztus 14., hétfő

Graylog, Elasticsearch, Maximum number of fields, graylog_deflector

Just because I'm not a Linux guy
A few days ago, I setup our shiny new Graylog server.
I successfully added something like 10+ windows servers to collect the event log entries from.
As the second part of the task I wanted to add linux servers also.
I added the first one, it looks like the collector running and the messages are arriving, but no message shown on the web console. Weird.
Digging a bit deeper I found thousands of this message in the indexer fail:
{"type":"illegal_argument_exception","reason":"Limit of total fields [1000] in index [graylog_0] has been exceeded"}
This means we exceeded the maximum field number (I think due to the event types in the Windows).
I read through some forum posts about it. Tried to change the settings in the elasticsearch.yml file.
It didn't help. The result of my actions was a inoperable elasticsearch.
Finally I deleted the whole thing (elasticsearch) together with the indexes, and reinstalled it.
The result:
A working elasticsearch instance. The 1000 field limit kept, and in addition I got a new error. It said something like this: The graylog_deflector is an index and not an alias.
Googling around, I found the problem, but not the solution. Then I was start to think instead of googling. What I've learned:

  1.  From one of the log files I learned, that the elasticsearch configuration isn't done through the config file but through the web API with JSON objects.
  2. curl is your friend
  3. The Graylog creates a graylog_deflector index when it can't find the graylog_deflector alias. What it unable to use. You can't do anything with it from the Graylog, so you screwed.


The solution based above:

  1. In the Graylog web UI go to the System/Indices>Indices. Select the Default index set
  2. In the Maintanance select the Rotate active write index. It will create a graylog_0 index (but it will not work)
  3. Go to the console and stop the graylog:
    sudo service graylog-server stop
  4. Handle the 1000 field problem:
    curl -XPUT 'http://localhost:9200/_all/_settings?preserve_existing=true' -d '{
      "index.mapping.total_fields.limit" : "5000"
    }'
  5. Stop the graylog_deflector index:
    curl -XPOST 'localhost:9200/graylog_deflector/_close?pretty'
  6. Delete the graylog_deflector index:
    curl -XDELETE 'localhost:9200/graylog_deflector?pretty'
  7. Add the graylog_deflector as alias to the newly created graylog_0 index:
    curl -XPOST 'localhost:9200/_aliases?pretty' -H 'Content-Type: application/json' -d'
    {
        "actions" : [
            { "add" : { "index" : "graylog_0", "alias" : "graylog_deflector" } }
        ]
    }'
  8. Restart graylog:
    sudo service graylog-server start
  9. Now the graylog starts the correct reindexing process it can even take days to finish, but you can see your collected messages in the meantime.


2016. március 26., szombat

AutomaTales - Into my safety zone

Ok. So let start:

I'm not a linux guru. There are many favors of linux distribution, but I've just some experience with Ubuntu and Debian. In addition I usually not using any linux GUI.
So when I start a linux based project, it means to install an Ubuntu.
As I decided, this project will be based on a Beaglebone Green. Let start to install a 14.04 LTS to it.
The basic information reside here: http://elinux.org/BeagleBoardUbuntu

1. You need to download the image from here: https://rcn-ee.com/rootfs/2016-02-11/flasher/BBB-eMMC-flasher-ubuntu-14.04.3-console-armhf-2016-02-11-2gb.img.xz
(today the 16.04 image already exists, but I stick to the older as it seems more stable), download the image writing tool (Win32DiskImager): https://sourceforge.net/projects/win32diskimager/files/latest/download
And you need an empty minimum 2GB uSD card.

2. Expand the image to a folder in you machine. For example the 7-Zip will do it. Install the Win32DiskImager.
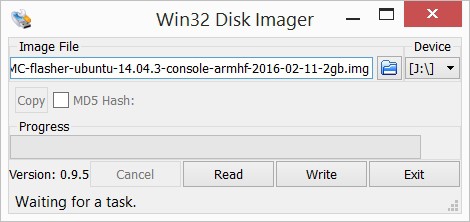
3. Write the image to a uSD card with the Win32DiskImager


4. When the writing is finished, insert the uSD card into the Beaglebone. Press and hold the boot select button (the one close to the uSD slot) while powering up the board. After short booting sequence you will see the "knight rider pattern" on the LEDs. Wait until it finish and the leds turn on.

5. Connect the board to the ethernet network. If you can figure out the address get by DHCP the steps from 6-8 are optional. Just reboot the board by power cycling it.

6. Install the PC driver for the board (if you have a BeagleBone Green, this is absolutelly necessary as you don't have HDMI connector to connect monitor). The windows driver can be downloaded from here:
64 bit: http://beagleboard.org/static/beaglebone/latest/Drivers/Windows/BONE_D64.exe
32 bit: http://beagleboard.org/static/beaglebone/latest/Drivers/Windows/BONE_DRV.exe
This is NOT a serial driver as you expect, but a virtual ethernet driver. You will need an SSH terminal to connect to Beaglebone.

7. Connect the Beaglebone to your PC. If it is was connected already, just cycle the power on it with removing and reconnecting the USB cable, when you disconnect the cable you can remove the uSD card, as you don't need it anymore.

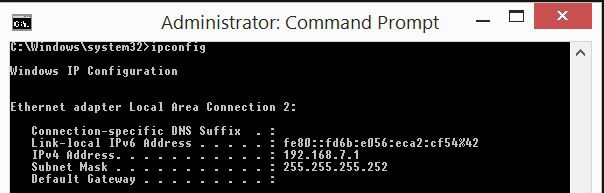
8. If you run ipconfig on your machine a new ethernet interface will appear:


You'll get 192.168.7.1 as a new interface on your machine, the Beaglebone will appear on the 192.168.7.2. You can connect to it with an SSH terminal like PuTTY

9. If you didn't used the USB/Ethernet to log in, just login via the DHCP provided IP address. If you need static IP address edit the /etc/network/interfaces file and setup the address.

10. If you check the DNS settings of the system it is probably not working. Just by editing the /etc/resolv.conf will not resolve the problem, as it gets overwriten on the next reboot.

Edit the /etc/resolvconf/interface-order file and put eth* to the first on the list. This will give you the correct DNS settings.

11. Reboot the board.

12. Install the updates with:

apt-get update
apt-get upgrade

2014. április 18., péntek

Ubuntu 14.04 LTS

 
Yes you see it correctly, this is an Ubuntu. To be precise an Xubuntu Desktop 14.04 LTS.
It was released yesterday. I installed it today dawn.
Yes, I'm a kind of  Windows guy. And?
There are some things I need nowadays and not available for Windows. So from now Linux also.

2013. június 19., szerda

Installing Ubuntu on BeagleBone Black

I write this post to collect all of the information needed to get a running Ubuntu configuration on the BBB. It just give a command line UI at the end.
Authentication data for the Ubuntu:
usr: ubuntu
pwd: ubuntu
The process:
1. Put a MicroSD card into an USB reader.
2. Connect an USB hub to the BBB.
3. Connect the MicroSD reader and the cordless desktop receiver to the USB HUB
4. Start the integrated Angstrom Linux
5. Download the Ubuntu Image. The information found here: http://www.armhf.com/index.php/boards/beaglebone-black/
This package is required for the Ubuntu 12.04 LTS:
http://s3.armhf.com/debian/precise/bone/ubuntu-precise-12.04.2-armhf-3.8.13-bone20.img.xz
6. Put the image to the SD card with the following command:
xz -cd ubuntu-precise-12.04.2-armhf-3.8.13-bone20.img.xz > /dev/sda
7. Mount the created filesystem (I forget this so I did it other way). Hopefully the devicefile correct:
mount /dev/sda2 /mnt
8. Copy the image (ubuntu-precise-12.04.2-armhf-3.8.13-bone20.img.xz) to the mounted filesystem somewhere
9. Shutdown the system put the MicroSD card into the MicroSD holder of the BBB.
10. Boot the Ubuntu first time from the SD.
11. Install the Ubuntu into the integrated MMC:
xz -cd ubuntu-precise-12.04.2-armhf-3.8.13-bone20.img.xz > /dev/mmcblk1
12. Shutdown, remove the MicroSD and start from the MMC
The first steps with the new system:
13. First of all you have to put the package management system into order:
sudo apt-get update
sudo apt-get upgrade

14. If you are using other keyboard layout than the default US you can change it:
dpkg-reconfigure keyboard-configuration
15. Change the password of the ubuntu user to something more secure

2013. június 18., kedd

New project: Nagios on BeagleBone Black

Here is my new project. It is not really an embeded project but it is on an embeded platform.
Today I'm using an HP MicroServer in my office as Nagios server. I'd like to change it to a BeagleBone Black what I recently purchased.
The process should be the following:
- Install Ubuntu Server to the BeagleBone (12.04 LTS or 13.04)
- Install nagios
- Move configuration files
- Done