A következő címkéjű bejegyzések mutatása: Learning. Összes bejegyzés megjelenítése

2018. február 3., szombat

BBC micro:bit and its speed

I'm experimenting a lot with BBC micro:bit recently. It is designed as education tool for kids. According to the microbit.org's intention it can be programmed in Block editor, JavaScript and Python.
Since it arrived to the market the maker community and commercial companies put big effort into it, so today it can be used in large amount of environment.
The original programming tools are good for learning, but not really targeted for professional MCU environment. If somebody want to learn something like this, must step forward. This has many aspects why. Here I'd like to show, that:

  • The micro:bit hardware not the limiting factor in first place
  • You can achieve much more speed from the MCU with those environments

About the board itself:
The micro:bit's core is a 16MHz ARM Cortex-M0 based bluetooth capable Nordic Semiconductor MCU. It is the same what used in commercial devices. The board itself also contains a second processor, an NXP Kinetis device. This second processor is responsible for the communication with the PC where we programming the main MCU from.
This second MCU is our ticket to the professional programming environments.
If you used micro:bit block editor before, you know if you connect the micro:bit to your PC, you will see a drive and you can drop your compiled code there. This drive emulator is handled by the NXP processor.
But this does more than that. It is acting as a debug probe also. It allows single stepping, register reading, etc. in the Nordic MCU, allowing the user the efficient debugging procedures with an developer environment it allows that.
Even you can choose between two different debug probe. The micro:bit arriving with DAPLink (CMSIS-DAP) probe, but it can be changed to Segger J-Link probe if your environment need this.

Now about the speed. I used a small test to show what can we achieve in various environments. The test does nothing else just switch an I/O pin of the device alternating 0 and 1 as fast as possible.
I used three environments for demonstration:

  • Block editor/Javascript - The original environment
  • Arduino - The first choice tool of Makers, Hobbiest around the globe
  • Segger Embedded Studio - One of the heavy professional tools (I choose this as it was the fastest to setup and started to work on the first touch)

The first try - It is written originally in JavaScript instead of Block editor as the Block editor unfortunately has no XOR function. It show what is happening if we alternate our output in the "forever" block:


How this look like in the Block editor:


I connected the output to an oscilloscope to measure the output frequency and see the waveform:


20.8Hz - Ouch it hurts. This means that our code in the forever block is called around 40 times in a second. This is extremely slow. I guess it is the result of the task scheduling of the operating system beneath us.

Let's do another test with this environment. But this time using our loop for switching the output. This is written in the Block editor as it has nothing can't be achieved there:


Just to see, it is here in JavaScript:


And the result:


84.7kHz - much better, but still, it needs 189 clock cycles to run this loop (calculated from the 16MHz clock)

Now go a bit further. The Arduino environment can be used for the micro:bit based on this:
https://learn.adafruit.com/use-micro-bit-with-arduino/install-board-and-blink

First I tried the same, using the environment's loop:


The result from the oscilloscope:


214kHz, much better. It is around 75 clock cycles.

Check the same with own loop:


Bit better but not substantially:


272kHz - 59 clock cycles

And finally the Segger Embedded Studio - as you can see, here the CPU initialization tasks are also in your control:


And the result:


943kHz - 17 clock cycles. If you want to achieve better result, you must go down into assembly level, what I not intend to do now.

From the things above, you can see a little slice of the picture.

2015. szeptember 1., kedd

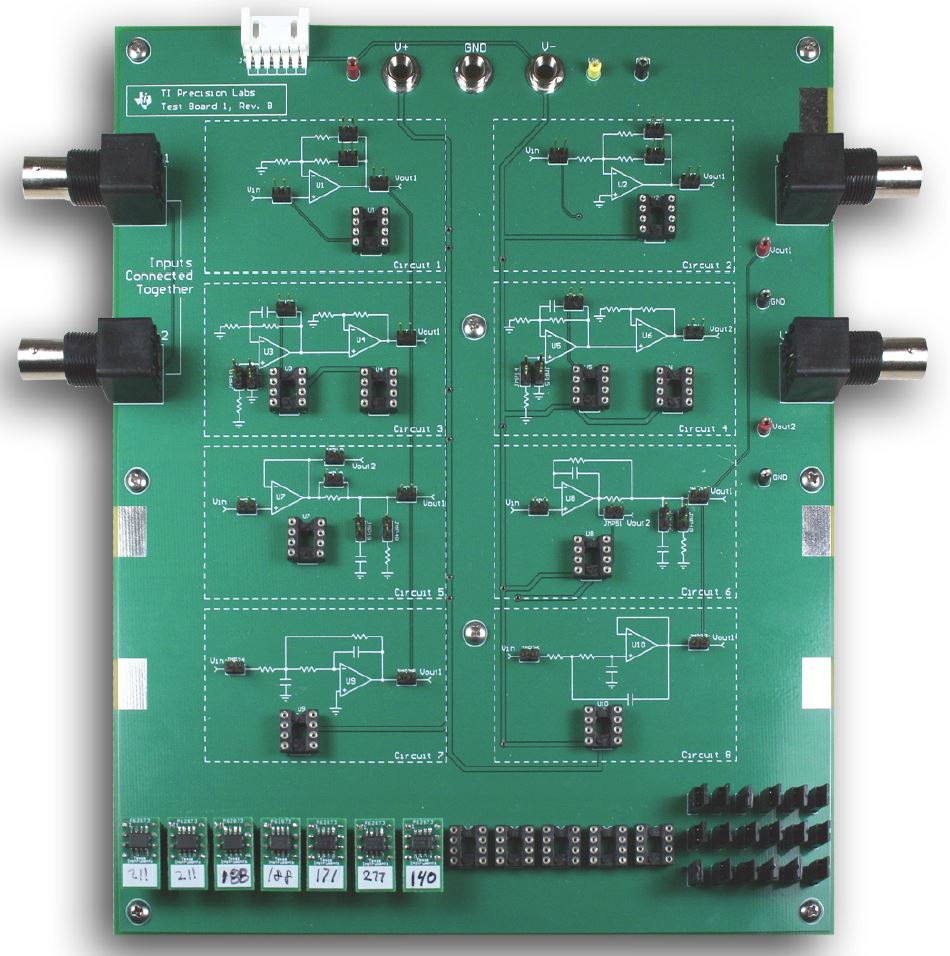
TI Precision Labs - Arrived

And finally...
After some fighting with the Fedex/Customs Office, it landed on my desk:


Let the learning begin...

2015. augusztus 19., szerda

Breaking News - TI Precision Labs

Here I wrote about the Texas Instruments Precision Labs, the insane price of it and my plans to replicate it.
I even started to work on it, replicated the schematics in KiCAD, created the PCBs for the OpAmp inserts, and partially designed the main board itself.
In addition I posted this project to the Hackaday.io, and it found it's way to the Hackaday blog itself:
http://hackaday.com/2015/06/10/hackaday-prize-entry-teaching-opamps/
I don't know if somebody at TI read what I wrote, but this came today in a newsletter:


So, mine is on the way to Budapest:


I payed ~$60 for it with shipping.
If you need it hurry up, while it lasts.
Notes:
First: The project is officially canceled - I've many more things to do
Second: Great thank you for Texas Instruments, for this offer!


2015. június 8., hétfő

TI Precision Labs Replica

Texas Instruments recently published a great video and lab series, for teaching some hands on and in depth knowledge on operational amplifiers here:
http://www.ti.com/lsds/ti/amplifiers-linear/precision-amplifier-precision-labs.page
I think, this is really a great idea. Dear TI, Thank you for providing this for the community. I really like it.
There is a problem with it on the other hand. The price for the NI's virtual lab is not for a hobbyist - Ok, we can use our own test gear for measuring.
And the price of the evaluation module for it is insane $199 for a board with few passives and few pluggable Op Amps???


Come on! This is the same company who spread the world with the $5 LaunchPads - Encouraging me to jump back to electronics after 20 years?
I just run around my sources with the BOM, not even trying to find the cheapest solution, even counting the shipment cost, calculating only one board, and the cost would be around 50 bucks. Even less if I put some research effort into it.
So, lets the journey begin. I'll replicate this kit...

2015. április 5., vasárnap

Dev Env - LightUp

The story starts almost two years ago.
As my son gets older (8 years old now), I was thinking to teach electronics, programing or both to him somehow. As I looking around just pop up something called LightUp on the Kickstarter.

http://www.lightup.io

I immediately jumped in to it, hoping that I'll get it to Christmas of 2013.
It didn't happened. After long waiting I got the kit sometime in Autumn 2014. It became a Christmas present for 2014.
My son started to play with the electronics part of the kit but not touched the MCU module included. As he reached the point making all of the tasks was included in the iOS app (what is unfortunately not too much), I tried to setup the MCU.
It was something like two month ago, and it was a major failure. I had two problem with it. The first is theoretical. I don't believe that is the best language to teach an 8 year old to program is the C++ even it is the simpler arduino's one. The second is the driver.
LightUp partnered with codebender to provide programing environment to the kit. Codebender is nothing else just an online Arduino IDE. They provide a driver pack, what is able to connect to virtually every Arduino compatible board. But the driver pack was not working with the LightUp MCU on my desk.
The story was put aside in this point.
A few days ago I seen, that my son started to play with the LightUp kit. This was a good indication to put some further work into the setup.
Went to codebender, downloaded the driver installed it, and the result was the same as two month ago:
This time I wasn't stopped here:
After installing it the result:
Success!
Finally I went to the CodeBender side to try it. When I started the IDE for the LightUp a LED blinking project was showing up:
Just downloaded it to the board, and started to work:
Conclusion:
What I see about the LightUp: This is an unfinished something. After a good start they lost their tempo. The idea to check the circuit with a camera is exciting, but they got nothing more. A large amount of example circuits and a kid friendly programing environment is missing.
In addition tons of far better kits are exists on the market (for example littlebits), what is kid friendly and gives the possibility to grow further. This one not.

2014. május 13., kedd

New course

The fact that I not completely finished the ARM course (but just the space invaders game left) and the Entrepreneurship course passed away without touching it, doesn't hold me back from starting a new one.
Precisely the Cyber-Physical Systems by Berkeley.
The subject is autonomous robot control from Visual Studio and National Instruments LabView. I didn't decided yet that I stay with the virtual labs or buy the necessary equipment. This one is relatively pricy for the Hungarian wallet and the fact that this course is for fun to me.
I finished the first module, if somebody interested just hurry up. The first deadline is today afternoon.

2014. április 29., kedd

ARM Course 11.

Finished.
At least with the evaluated things. Just the module 15 left. It would be great to finish the game until the submission deadline (7th May).
Here is the result:


2014. április 27., vasárnap

The week of the catastrophy

Since the Friday of the previous week I haven't wrote anything. This more than a week wasn't passed without events. I can tell it was catastrophic in all aspects. I just hope, that my actions will have better results on the next week. Without the demand for the correct timeline I write down, what happened:

Myself
I'm at home for a week now. I'm sick most of the time I was lying in the bed, reading. Tried to cure my ear/eye/nose/throat etc. problems. My left ear is still not working.

HeeksCNC
I was trying to build the CAM software named HeeksCNC. First I tried on Windows. It won't work. The compiler gave some insane error.
After this I tried it on the fresh Ubuntu 14.04 LTS. After more than two days struggling finally worked. The build and not the program. When I started the application and tried to create a new tool in it, I got a segmentation fault. I could spend additional days with it (most probably the versions of the OpenCascade/OCE is the problem), but my goal is not building but using it.
So I installed the trial of the Windows based official build. This at least not freezing just time to time stops for a few minutes then goes forward. The problem not solved, and will not to be for a while.

FRDM-KE06Z
I ordered two of this board. Earlier I bought a Pololu Zumo robot for my son, and I planed to assemble it sometime. The robot itself is in one piece for a time already, just I didn't wanted to use put an Arduino on top of it.

 
Instead of the Arduino I wanted to use a KL25 based freedom board based on Erich Steyger's work. Finally I didn't liked the problems with the 3.3V/5V power supply so I put it aside. Now this board seems to be the solution because it works on 5V.


I bought two, to be able to experiment with it after finishing the robot.
The first mistake I made that I soldered not just the Arduino headers in but also the header at end of the board. This mechanically collide into the Zumo blade. No problem, this board will be my experimenting one. Picked the second board and soldered in without the header in question.
A few days later I started to play with it. I tried to put a sample application to it. Since that just the bootloader pops up, the LED blinking and according to the status file it is in "Programming..." state. Forever.
I managed a brick from it. After a few hours of searching I was able to find out nothing (to be precise I seen a comment somewhere that the Windows 7/8 may can correct it, but I've only 8.1 at home already).
The actual status: I need a new board.

3D Printer
To exchange the printhead to the new one I have to print one additional component. The new fan holder. I'm trying to achieve it for the third time (I wrote the whole story already just didn't published it, on the next week I'll takte the time to finish the part of my half finished articles). I cleaned the printer and started the print.
It doesn't start.
The heating of the build platform switched off around 85°C, and I wasn't able to switch it back. A few days later I retried it. The result is the same (at least the heating started and not completely dead).
I remembered from somewhere, that others also had similar problem with the heating of the build platform. They put an SSR into the control circuit.
It should not cause problem. I try it.
With half hour hard work removed the pőower supply from it's place. I've more and more the thought the I would never honor them an "Excelence of engineering" kind of award.
I put in an SSR removed from an old equipment.
The heating won't start.
Let's measure.
I set my DMM to 20V. Measured the input of the SSR. The  instrument signals overvoltage. Set to 200V, the result: 178V. Switched off  everything and removed the load's cables. The PSU without load: 178V.
Thinking, cooling down. If it would be true the circuits would already produce smoke and smell. Switch the instrument to 1000V, the measured value: 12V. I thing I had a DMM.
Picked my old, half dead Metex out of the drawer. It measures 12V everywhere.
Reconnected everything, put a new SSR intead of the savaged one.


The heating started. The SSR also heats like hell. The 25A reated SSR will not be enough (and of course I didn't have a bigger at home). For a time being I put a heatsink under it, to see the outcome.
It heated the platform correctly, but it can't be used in this way. I've to order a bigger SSR. This is waste of time until it arrives.

DMM - continuation
The end of the story that I don't have a working DMM (I should build one. :-D ).
My Metex is 25 years old. It has permission to give up. To be precise it is not dead just the resistance measurement not realy works (I think that is the rotary switch).
The other one the Maxwell - it looks like a Chinese crap to me (Don't misunderstand me! I've no problems with the Chinese goods. There are manufacturing good and bad things like everywhere on the earth. This thing especially not on the good side). But because of it's capabilities I payed more than €50 for it a few years ago.
It is enough to me. The Metex doesn't exists anymore (or at least I don't know where to find it). Except of the big names (Fluke, Agilent) the things what man can buy (Maxwell, Tenma, Voltcraft by Conrad, etc.) I've no idea which is "instrument" and which is crap.
So I ordered a basic Agilent DMM.


This even costs €110 to me but with 2-3 trial I can spend same amount of money to crap and the outcome would be questionable.
The good thing on it that I'll get the replacement of the bricked FRDM board with one shipment cost.

And on the positive side
It is just a sidenote: I reserved some time to the ARM course and finished three modules (11-13) and all of the quiz. So just the 14th lab and the 15th module (what is not evaluated), the creation of the game project left behind. It not seems impossible until 7th May.

2014. április 7., hétfő

ARM Course 10. - FSM

After a long skip continued the ARM Course. The section 10 is the hardest part according to the instructors. My opinion is the same. And it is the most useful. I've gaps in my knowledge for shure, or maybe my education was incomplete (I was learning embedded systems something like 20 years ago in the college), but this is the first time I've heard about FSM (Finite State Machine). It a very simple simple method for subscribing and programming something what is required for an MCU based system on daily bases. I'm absolutely sure that I'll use it frequently.
I finished both the quiz and the lab.
Her is the working traffic light:

2014. március 19., szerda

Entrepreneur Course 1. - 0th impressions

In early morning when I woke up looked into the site. I don't see what will be with this for a while. Deliverable only scheduled to the end of the course, but the 60% of it is in text format.
I've concerns with it:
  • I don't understand how will it be evaluated
  • I'm not so confident with my English language skills, to be able to write this.
  • There are some kind of interviews needed. Frankly I don't have a clue who can be the subject and what is the context
So I start to read and watch the material and we will se.
May it wasn't a good idea to sign into the ID Verified Certification on the first place?

2014. március 18., kedd

Course - Be Entrepreneurs


In theory MIT's Entrepreneurship 101 course starts today. This is a nontechnical course what I need for my business. So I registered to it. Unfortunately the course material is still not available. I wanted to check the schedule to know the deadlines.

In detail:
https://www.edx.org/course/mitx/mitx-15-390x-entrepreneurship-101-who-1312

2014. március 3., hétfő

ARM Course 9. - Lab 9.

This also finished.
I'm getting sick of LED blinking.
I'm sure that at this Lab the description and the required behavior is not the same. So I found only the solution in the forum.
In the description was "record PortF bits 4,1,0 every time the input changes or the output changes", but the solution:
record PortF bits 4,1,0 every time the input changes or on and the output changes
In addition the information was missing about the storage of the initial state value - it should not be stored.

2014. február 24., hétfő

ARM Course 8. - LAB 8

Yesterday evening I've finished the module 8. With this I'm standing at 47% (I need 70%). I still not feel the high level of this course. It take something like ten minutes to write and test the code, the construction of the circuit on the breadboard.
I've documented the result here:


32 Bit, 80 MHz and the LED blinking (my first PC had a 16 Bit 8 MHz CPU with a little more result). The biggest challenge during the construction was that I caught a bug. To be precise, not a bug but a "misprint".
I was looking for the the PE0 pin on the board. Finally I fond. Here:


Check the yellow marked designators! The two parts of the photo displays a part of the top and the bottom side of the Launchpad.

2014. február 19., szerda

ARM Course 7. - Sidenote

Unfortunately I had no time to continue the course material, because my other running projects (Frequency Counter, UV Lightbox, etc.) required some time.
Today I get a letter from Texas Instruments what is related to the course. They announced of the "Cloud Connected" Tiva C Launchpad (what we using for the course). If somebody register, even can win this stuff:
http://www.ti.com/ww/en/mcu/Tiva_Connected_Launchpad_Eur/

2014. február 17., hétfő

ARM Course 6. - The continuation

Uppps. The previous post also had the same name.
So, according to the facebook page of the course, the continuation will be available within two hours: at 18:00 UTC. The 8-11. chapter.
When I finish at the dentist, I can start to work on it (or maybe I'll do other things, I've plenty of tasks waiting for me).

2014. február 5., szerda

ARM Course 5. - The continuation

So I'm not happy. I was looking around on the course forum. The continuation will be released on 13th february.
I can do two things:
  • Wait (do other tings)
  • Start to work on the unofficial material

2014. február 4., kedd

ARM Course 4. - Comments to the Lab 7

The Lab 7 is not about the coding, but about understanding and modifying code written by others.
I read the original and found this:

  //S
  GPIO_PORTF_DATA_R |= 0x08;  delay(1);
  GPIO_PORTF_DATA_R &= ~0x08; delay(1);
  GPIO_PORTF_DATA_R |= 0x08;  delay(1);
  GPIO_PORTF_DATA_R &= ~0x08; delay(1);
  GPIO_PORTF_DATA_R |= 0x08;  delay(1);
  GPIO_PORTF_DATA_R &= ~0x08; delay(1);
  //O
  GPIO_PORTF_DATA_R |= 0x08; delay(4);
  GPIO_PORTF_DATA_R &= ~0x08;delay(4);
  GPIO_PORTF_DATA_R |= 0x08; delay(4);
  GPIO_PORTF_DATA_R &= ~0x08;delay(4);
  GPIO_PORTF_DATA_R |= 0x08; delay(4);
  GPIO_PORTF_DATA_R &= ~0x08;delay(4);
  //S
  GPIO_PORTF_DATA_R |= 0x08; delay(1);
  GPIO_PORTF_DATA_R &= ~0x08;delay(1);
  GPIO_PORTF_DATA_R |= 0x08; delay(1);
  GPIO_PORTF_DATA_R &= ~0x08;delay(1);
  GPIO_PORTF_DATA_R |= 0x08; delay(1);
  GPIO_PORTF_DATA_R &= ~0x08;delay(1);
  delay(10); // Delay for 5 secs in between flashes


Come on! Are you certain? Professionals write code like this? Tell me, this is a joke, not?
At least this. And this barely good enough:

    char i;
    char j;
    char delays[3] = {1,4,1};
    for(i=0;i<3;i++)
    {
        for(j=0;j<3;j++)
        {
            GPIO_PORTF_DATA_R |= 0x08;
            delay(delays[i]);
            GPIO_PORTF_DATA_R &= ~0x08;
            delay(delays[i]);
        }
    }
    delay(10);

Do not panic. This is not the solution just the rewriting of the code above.
And this is the end of the 7th module. And what's next?
The 8th module is nowhere. To be precise "under development":
http://users.ece.utexas.edu/~valvano/Volume1/E-Book/


2014. február 3., hétfő

ARM Course 3. - Videos

In the mean time it turned out that the course videos are not only available on the YouTube but also available in the Amazon S3 (my favorite in these days). Here is the full list (just the first 7 module there yet):
http://users.ece.utexas.edu/~valvano/Volume1/E-Book/VideoLinks.htm

2014. február 2., vasárnap

ARM Course 2. - Over the 6th module

I've finished the 6th module, written the necessary code. This module at least gave some useful information and writing the code needed more time than five minutes (it just because I haven't checked some prerequisite in the material).
Now I don't know how to continue. Half of the 7th module already done and I intend to finish it tonight, but no more modules released yet.

2014. január 28., kedd

ARM Course 1. - First Impressions

So, I started the course. Within not a full week I finished 5 modules. Until this moment I lost only a half point (just because I was not careful enough).
Unfortunately until now I feel this material is not deep enough to me, but I'm not a C programmer ace. I hope that the later material will be harder, because under a name "Lab" writing a multiplication of two unsigned integer within a conditional block containing and relation of four basic expressions took me less that two minutes and it was producing a 100% in the grading on the first run.
If it goes this way, I'll finish the course in no time, but the learning value is doubtful to me. :-(