2022. április 4., hétfő

Pan & Tilt gimbal project?

In the last two weeks I didn't have too much time to work on my hobby projects or even to continue to build my lab.

To be honest I even didn't feel like working on any of my currently running projects. (There is the time to start a new unfinished project 😄)

There is something itching in my mind. I need an MCU controlled pan and tilt head for a mobile phone (camera). I would like to have it to generate a 360 view for a room, what I need for undisclosed reasons.

The original idea to build the pan and tilt head from 3D printed parts and Nema stepper motors. Control it from an ESP32 based 3D printer controller, like this:
https://www.aliexpress.com/item/1005001704413148.html

Also add some Wi-Fi based web interface to the ESP32 and control the phone mounted on the pan and tilt head via blutooth.

This idea was forming in the last two weeks. Fortunately I didn't order the things I collected for this. Those are just sitting in my Aliexpress basket.

Yesterday I was thinking to start the ESP programming and the 3D design of the components.

Eventually I found something interesting

This is a Zifon YT-1000 pan & tilt head.
This also has wireless remote, costs bit more than $80 delivered.
This thing is a good candidate for my project. It lack of the automation I need, but has most of the capabilities I require.
Unable to control the phone, take all of the pictures I need, but almost there.
Here come the question. Is it hackable?
The answer located here:
From the post you can figure out that the wireless controller is a JDY-40-V1.2 wireless serial transceiver module.
No, it isn't available on the Aliexpress. It is sold by Electrodragon under the name EY-40:
I would have reservations about a market player I didn't know. But with Electrodragon I don't have, as I ordered my ESP8266 based wi-fi switches (before even sonoff existence) from them, and had no problems.
So now the pan & tilt head + remote modules are on the way to me.
The project is simplified itself to the ESP32 programming while replacing the motor control part with the EY-40 commands.


2022. március 13., vasárnap

New workshop 3.

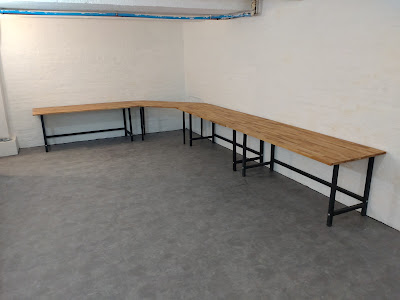
In almost all of my free time on the last week, I worked on the lab benches. Sanded, drilled, oiled, built.

Here is the result:

Unfortunately, it is far form the end. But at least some progress.

At the long weekend I plan to move some things down, and also start to work on my big rack cabinets I have already.

New Arrivals 4.

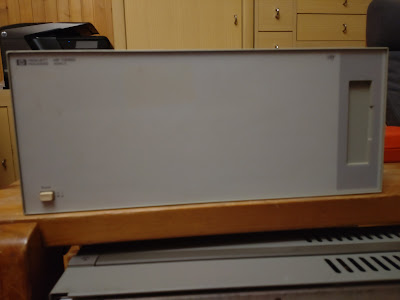
I couldn't resist. I bought two additional VXI Mainframes.

Since I got the first, wanted one with the keypad and the display in the front. The one without it just looks ugly.


Actually I have been fortunate with this one. From inside it is clean almost the way it just left the factory:


The second unit, I mainly bought for the boards included. It has E1340A function generator, E1330B digital I/O, and two E1345A relay mux cards in addition to the regular CPU board and multimeter.
I wasn't so fortunate with this unit:


It looks like (how here in Hungary would say) somebody pull it out from a cows ass.
The frame bended at several places. The thing is extremely dirty, dead spiders and spider web inside, the power switch button broken off, the front panel joints are broken.
As I have altogether 5 units now. I decided to part this one out. I don't know If I sell the cleaned and tested parts, or just drop it in a box to use it as spare parts for the future.

The boards for the front panel binding posts are also arrived.


Just assembled one quickly:
Unfortunately my 3D printer has some issues, So I can't print the mounting hardware right now. Update is coming on this.


As I building my new lab, I know that I'll have some twisted pair cabling work. I not yet know which kind of crimping system will I use. So ordered a Krone tool and a 110 tool.
Only the Krone arrived yet.


When arrived I just realized, I already have one in my old lab (such an idiot!)
I also bought a few things for my lab in Conrad. Among the others, I also bought a brass solder cleaner "sponge", as perviously I boght a 2nd hand soldering station. The previous owner just used a complete kitchen steel sponge, not even understand how he was able to push it in the soldering iron holder. 😃


2022. március 2., szerda

New workshop 2.

Back in December I wrote about my new workshop. It is basically a cellar I rented from the local municipality. It was in horrible condition.

More than two month elapsed since. It looks much better now.


The the broken concrete pillars repaired, the walls painted, and it got an antistatic PVC floor.

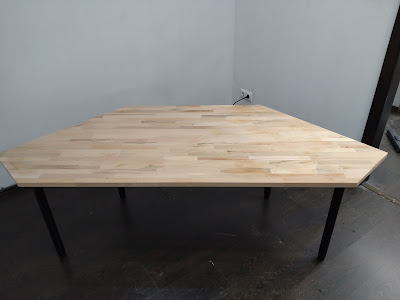
I decided to have self made desks. Fortunately I was so lucky to find 200x80x2,7cm beech tables for ~$100 each (the todays wood prices become nightmare). The plan is to have four desks. One for soldering, microscope, one corner desk for computers, one for measurements and instruments, one for mechanical work (to be honest knowing myself it will generate ~7m2 desk area to fill with mess 😂).

Bought also steel workbench legs. The desks will only be cut (just the corner unit), sanded and oiled.

Currently the corner desks wait for oiling (cutting and sanding is done).

And the legs are assembled for the rest of the desks:

This is the current status, I'll continue, when I've time for it.

2022. február 19., szombat

Measurement Control - Direction 2.

There are lots (or you can call nothing) happened since the last post regarding my measurement control application.

Name

I didn't like the random names I gave to this solution (Control software, interface, anything). Didn't look and feel professional. Finally I found a name for it: MeasureFlow

Registered a domain for it:

measureflow.org

(nothing there yet)

A github and a gitlab group:

https://github.com/MeasureFlow

https://gitlab.com/MeasureFlow

Software

I have the direction (partially). The software was plug-in based, but not other ways modular. I decided to architecturally separate the application to frontend and backend. The backend will be dotnet 6 based minimal REST API. The frontend is still question.

Started to write the backend. As the codebase doesn't need too much porting until we just talking about the instrument continuous measurement and not a complex workflow. So it is almost working (just didn't try out the last pieces yet)

Hardware

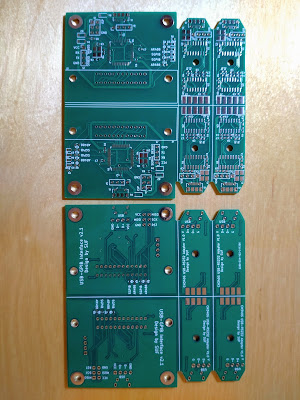
The ordered PCBs arrived (both the USB-GPIB and the USB-RS232). I was so fortunate in this chip demanding times to find 10 ATMEGA32U4 locally.


I didn't find the time yet to solder and test. Anyway it need firmware, so it is useless until I resolve the firmware related questions.

Firmware

We arrived to the point, what cause most of the troubles to me in this whole picture.

During the last week, in my free time I mostly tried to understand the USBTMC based implementation I found online. I didn't become a big fan of it. No proper reusable implementation of the USBTMC interface what corelate to the LUFA design principles. It is based on a not finished, so fuzzy LUFA demo, bad handling of the AVR pins, weird off interface configuration handling.

Tried to understand, how it is work, how can I port to my hardware. Originally I just wanted to exchange the pin layout for my own hardware design, but I know now, I can't stop there.

Last Sunday then I finally realized the biggest problem I have with this whole thing. What I found was shocking to me. Root of the problems is not the implementation, but the standard itself.

The standardizing board was thinking completely differently than myself.

Their intention: create a solution on instrument side what able to wrap the existing GPIB interface while moving the development to the native USBTMC interface

My intention is to create a device what can sit between the USB and several GPIB based devices, handle sub addresses also.

At first read you may not find too much difference between this two. The difference is that the standard doesn't contains anything to address the GPIB devices. It presume that the USBTMC device with USB488 extension connected to the USB port is a single instrument and not many of it.

If I would just deal with instruments without GPIB sub addresses, I would may live with this, but unfortunately this is not the case. I've VXI mainframes, Power mainframe with GPIB sub addressing.

Even if I dig further neither HP (Agilent/Keysight) nor National Instruments who manufacture USB-GPIB interfaces use USBTMC with USB488 extension in their devices (HP 82357B, NI GPIB-USB-HS). They use standard base device USB ID or vendor specific. Those are proprietary.

Back to my unit. Here I should decide, what direction should I chose while developing the firmware of my adapter. Here are a few possible path I can think of:

  1. Resume working on my USB-CDC implementation (based on Prologix command set). It has drawbacks like CDC is slower than the USB native bulk endpoints, on the host side I need to port my own driver to the MeasureFlow software, will not be compatible almost any of the existing host side software stacks.
  2. Use AR488 firmware. In addition to all of the drawbacks above, I need to implement the subaddressing (or secondary addressing), in their codebase as it still not implemented yet.
  3. Mimic HP or NI interface. This is problematic from various standpoints. Lots of USB sniffing, possible copyright issues, etc.
  4. Develop a USB composite device - check with poc if Keysight IO library supports this. The concept is to have one CDC device used as control channel (manual device setup, SCPI emulation, etc.). Generate dynamic USBTMC device for each GPIB device (primary and secondary address) based on automatic device discovery or manual setup.
Currently it looks like that the last one is the target, if I not run into unresolvable issues.

2022. február 7., hétfő

New Arrivals 3. - feels like Christmas

After the EU eliminated the €22 tax free limit for the incoming goods (I don't know if this was the reason), AliExpress changed the delivery method. They are collecting the things you ordered from various suppliers and put those to a single envelope. You get the envelope faster, from a trusted courier and not from the local post.

The packages inside. I feel like Christmas with many presents


Now, check, what is inside.
Binding posts and switches for my front panel project (https://pakahuszar.blogspot.com/2022/01/hp-e1300a-front-binding-posts-1.html). As those are here, I can take a few measurement to check, everything is in order with my design, and I can order the boards for it.


I'm using replacement fans in the E1300A originally designed for PCs. I'm not a big fan of  cutting the plugs from it and replace with the E1300A compatible one (yess, I'm an idiot). So I ordered connectors. With those I can create converters between the fan connector and the connector on the E1300A power board.
Back in December I bought a Keithley 236 SMU (didn't write about it here). It has triaxial connectors. Unfortunately, it is not easy to find (or cheap) triax connector or double shielded cable (the one has insulation between the two shielding layers). I think a bit further. The SMU measure between the inner core and the first shield. This means insulation between the poles, what is capacitance and therefore leakage current (yes, it is just picoamperes, but it has impact on the measurement at the levels where the SMU is working). So what if I use instead two cables shielded separately, and put those into a single external insulator.
For this I bought some pigtail cable for this. It is so tiny (1.3mm diameter), that I have doubts if I can work with it.
We will see, when the connectors also arrive.


In my free time, I'm still working on my measurement control software. On the side of trying out as many instruments as I can, I also want to test it with various GPIB interfaces (just USB based ones right now).
So I ordered an NI GPIB-USB-HS (I already have an Agilent 82357B).
From the packaging, markings it totally looks like original.


And the funny thing. It came from China, but it is manufactured here in Hungary.

And the last item for today.
I scored this unit locally for ~$20. I mainly bought it for the case itself (a solid modular eurocard size enclosure). It contains also a 24V PSU, four TDA2030 based power amplifiers and several connectors.
I plan to use the enclosure for my long abandoned (hopefully restarting) Curve Tracer project.


2022. január 26., szerda

HP E1300A Front binding posts 1.

Have you ever fall into the situation when you feel you have a quick and easy project, and at the day you realize it took tremendous amount of your time?

This is that kind of project.

Back to the beginning, I'm working on repairing, programming my HP E1300A VXI mainframes (actually I've three of it). The look of the front panel is a joke. A big beige panel with almost nothing on it.


The other thing I don't like on this instrument that it has binding posts for the integrated DMM just on the back side.

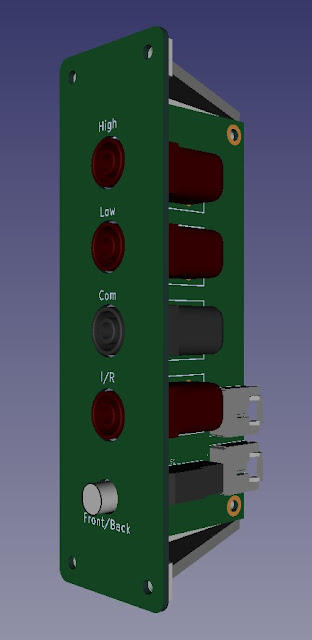
I don't want to modify the unit the way it can't be undone, but I need the binding posts to the front panel.

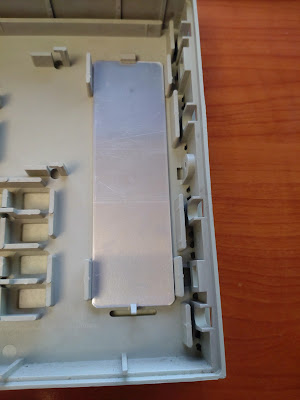
What I almost certainly know, I'll never use the space for the floppy drive for anything. The faceplate can be easily removed, and put something into it's place.

So I designed a small breakout board, with front panel, mounting hardware here. There were missing library parts, modules, 3D models in the KiCAD, first time used FreeCAD for the final assembly, made a millimeter misalignment during the design, and various additional problems. This made a week project from the one I planned for a single evening.

Here is the result:


I think there is not too much additional thing to write about it.

The design files are located here: 

https://gitlab.com/suf/suf-electronics-E1326-Front

I'm just thinking loudly. Is there a demand for this unit? Maybe it could be my attempt after a few years to sell one of my designs on the eBay or Tindie.